
One of my favorite things about having a blog is the creative freedom it provides, not only in writing content but also in presenting it. Over the past two years that I’ve had this blog, the way it has looked has gone through a handful of iterations as I’ve tweaked and honed my style to get closer to a design that feels right.
That’s one of the reasons that I chose to go with Blogger as my hosting platform, because you can change so much about the way your content is presented. The only catch is that you have to know how to do that; there isn’t a simple checkbox to click if you want a certain feature to stop showing. Things like that normally require going into the HTML code of your site and tweaking stuff. It might feel a little too technical at first, but as long as you can find a reliable source to use, it usually isn’t very difficult to make many changes!
I wanted to share some of the tutorials I’ve used for changing the way my blog looks. Each of these are the ones I found to be most helpful, easy-to-follow and have played a role in the blog design you see here today. Enjoy!
1. Before you touch anything, do this.
One of the first things you should know about experimenting with your HTML code is that you should always back your template up first. Even a code that works on everyone else’s blog might not work on yours, so keep your original template safe and sound in case something does go wonky. Here’s a good explanation of how to back up your template.
2. Remove the Blogger navigation bar along the top.
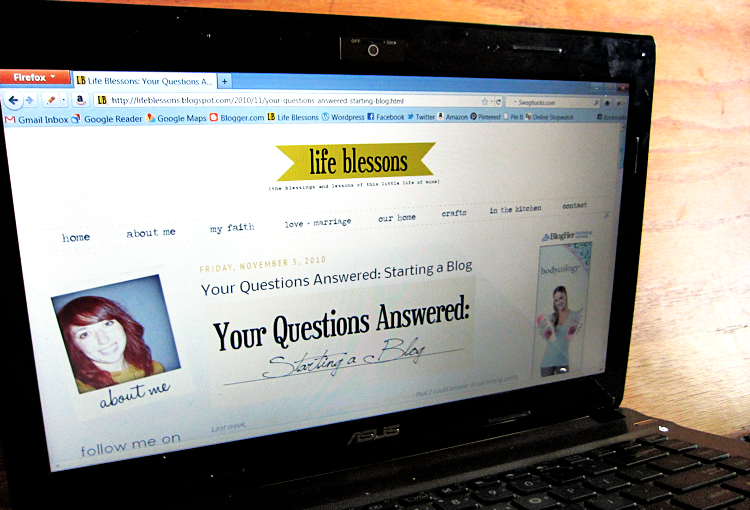
I’m talking about that pesky bar that floats at the top of most Blogger-hosted blogs and has the options for searching the blog, skipping to the next one, etc. Because you can load your own search bar into your blog and add a Google Friend Connect widget, I don’t think you need this navbar. Here’s how to get rid of the Blogger navigation bar entirely, which I think makes for a more sleek looking design.
3. Add a favicon to your blog.
A “favicon” is the little icon that appears in the browser tab for a particular website. Standard on Blogger blogs is an orange box with a “B” on it. But you can easily change this to personalize the favicon to your blog. For example, mine is a yellow box with “LB” written in. Here’s the site that I used to create my favicon, which allows you to upload your own image and then will provide the code necessary to add the favicon to your site.
4. Change up your links to “older posts” and “newer posts.”
When you scroll down to the bottom page of a blog hosted on Blogger, there will be links that say “Older Posts,” “Home,” or “Newer Posts.” I didn’t like the way that they were set up (“Older” was flush right, when it seems more intuitive to me for it to be flush left). So, I decided to change them (and get rid of "Home" entirely). I created my own buttons, but used this tutorial for how to switch up the code.
5. Create an image map.
I’ve written before about how I like to use images in my sidebars for navigation. One neat thing is that instead of linking an entire image to a URL, you can actually just link a portion of the image. It’s more complicated, but it allows you to be able to create just one image, align it to your liking and then just determine which areas will be clickable. You can see an example of this in my left sidebar where I’ve created an image that links to my pages on Facebook, Twitter, Pinterest and more. Here’s the tutorial I used to create my image map.
Do you have any blogging resources that you've found especially helpful? If so, please share them in the comments. I'm always looking for new ways to spruce up the look, feel and functionality of my blog!
Please note that some of these resources are written specifically for blogs hosted on the Blogger platform, so if you’re using something else, know that they may not work on your specific blog.
Related Posts
Answering Your Questions: Blog Design
Why I Use Blogger Instead of Wordpress


Sweet! I just removed my blogger navbar and favicon thanks to this - I hadn't even though of doing those things since I'm still adjusting to the switch from Wordpress to Blogger. I love blogging resources!
ReplyDeleteAwesome! I'm glad those links were helpful. I am always wondering, "Hmm I wonder if I can change this," and googling how to do that kind of html stuff. I've been surprised at how many fixes there have been online!
ReplyDeleteThanks for the great tips.
ReplyDeleteHi! I am new to your blog and LOVING it!
ReplyDeleteThanks so much for all of the great blogging advice. I am bran-new to blogging and trying to learn as much as I can to be successful. What an inspiration your blog is! It's so cute!
I found you through Money Saving Mom, and I tried out your bagel recipe this week. It was yummy!
Thanks for all of the inspiration and your Newlywed series. We too have been married for 2 years (well, almost), and I feel like I can really relate to what you are writing about.
Definitely a fan of your site!
Thanks for the helpful advice!!!! :)
ReplyDeleteThanks for sharing these tips~! I am usually intimated by HTML so I will take all the help I can get :)
ReplyDeleteAlso, could you share how to make the different pages on your blog? I know how to make the tabs at the top but how do I get content on the pages?
Thanks alot for sharing
~ Shannon
@ Liv, Whitney & Charissa - So glad you all found these links helpful. I know how hard it can be to sort through online resources, so I'm happy to pass my experiences along :)
ReplyDelete@ Shannon - Sure! It's actually pretty easy to set up new pages in Blogger, if you know where to go: First, log into your account and then click on the tab that says "Posting." There will be a couple of links beneath it, one of which will say "Edit Pages." Click there and you'll be able to set up new pages on your blog!
Thanks for the tips! I stumbled upon your blog just a week ago and just tonight I was switching things up on my blog and checked your latest post and I'm so glad I did! Perfect timing ;)
ReplyDeleteI never even knew you could get rid of the Blogger navigation bar... my blog looks SO much "nicer" without it... so thanks for sharing!
Thank you Carmen!! I've been wanting to get rid of that ugly and intrusive nav bar for ages!!! Needless to say it's now gone. Thanks.
ReplyDeleteWell,it sounds like the blogger nav bar removal has been the favorite tutorial of them all! I'm not surprised :) Glad I could be of assistance!
ReplyDeleteCarmen these tips are so helpful! I've been wondering about some of them recently, so your post was just what I needed :)
ReplyDeletethanks! definitely bookmarking this - it's super helpful!
ReplyDeleteThis was so handy!!! :) Thank you so much. I have a question for you - My current blog layout has a non-white background, and every image I upload to it comes with a slightly irritating white border around it I'd like to get rid of! Do you have any idea how to get rid of that?
ReplyDeletehttp://www.thoserootsandwings.blogspot.com
@ Daryl - Glad to hear that this post was helpful! Not one hundred percent sure what the culprit is, but my guess is that if you go into your blog's html and search for "border=", scroll through those and find the one that is in regards to your images. Likely the number on the end of the equal sign is a 1 or 2. Just change that number to 0 and see if that doesn't clean it up!
ReplyDeleteHey! I found your blog yesterday and I love it! I've already added it to my google reader! I had a question about the tabs across the top. I already use the pages feature for my blogspot blog.. but was wondering what HTML coding you used for the dashed yellow lines, etc. I am familiar with HTML coding, but have not tried it a whole lot on my blog
ReplyDelete@ Imani - Glad to hear you're enjoying my blog, and thanks for stopping by! As for the dashed lines, that's actual a graphic I made and uploaded, so no real HTML there. I did use an HTML tutorial for the drop-down menus, but it's pretty complicated. If you're interested in the link to that, scroll down to the comments on this post and it'll give you some more info.
ReplyDelete