Walking Through Scripture: Psalm 31


Right now in my daily Bible reading, I'm making my way slowlypurposefully and intentionally so—through each prayer and song and emotion-filled word in the book of Psalms. Every once in awhile, I'll be posting my reflections on some of these psalms, which you can reference here.

This is a longer psalm, so I journalled as I went, reflecting on one or two verses at a time as I journalled. The neat thing about looking at the psalm in this way is that it goes to show how much meat is really there, if we take the time to linger and look and chew.

It may only be 24 verses long, but I took two pages worth of notes on it, and that's without even consulting commentaries or other theological texts. The Word is full of treasures, waiting to be discovered! Here's some of what I took note of as I read...


Psalm 31

For the choir director: A psalm of David. (from the New Living Translation)
O Lord, I have come to you for protection;
    don’t let me be disgraced.
    Save me, for you do what is right.
(verse 1) David came to God for protection—because he knows that God does "what is right." I can relate to this sentiment; I want it to be God who protects and leads and guides and delivers me because I know that when he's at the helm, everything will always work out better. He will always "do what is right." And so it's always in my best intentions to look to him for answers.
Turn your ear to listen to me;
    rescue me quickly.
Be my rock of protection,
    a fortress where I will be safe.
(verse 2) In my Bible, they translate the first part of this verse as, "Bend down and listen to me." I love that image, because it reminds me of a parent, stooping down to listen to their child. And if you think about it, they don't have to bend down to hear the child. They can certainly hear the child if they're standing erect and looking down at the child. So why do they stoop? To get down on the child's level, to let the child feel heard, to let the child feel loved. It's for the child's benefit that they "bend down and listen." So it is with God.
You are my rock and my fortress. For the honor of your name, lead me out of this danger.
(verse 3) In this image, of God as a fortress, there's this underlying idea that God can protect us fully and keep us completely safe from our enemies, where they cannot get to us at all. God can protect us from harm and evil and hardship. So when he doesn't, when those things do threaten us, we must trust that his rescue is coming in a different way or form.
Pull me from the trap my enemies set for me,
    for I find protection in you alone.
I entrust my spirit into your hand.
    Rescue me, Lord, for you are a faithful God.
(verses 4-5) "I entrust my spirit into your hand." David comes to God alone for protection, and not just protection regarding his body or his circumstances, but for his whole being, even down to his spirit. Why is he willing to entrust it all? Because "you are a faithful God." He knows that God will act and, like we saw in verse 1, always does what is right. For us, this should be encouragement to not keep any part of ourselves from God's work and redemption. He is the only one who can accomplish complete rescue. 
I hate those who worship worthless idols.
    I trust in the Lord.
I will be glad and rejoice in your unfailing love,
    for you have seen my troubles,
    and you care about the anguish of my soul.
You have not handed me over to my enemies
    but have set me in a safe place.
(verses 6-8) In these verses, we see some of the ways that God has shown David faithfulness even in his suffering: by caring about the anguish of his soul; by noticing (seeing, verse 7) his troubles and being aware of them;  by not handing him over to his enemy but setting him in a safe place. Even in the difficult and discouraging, glimpses of God can always be found—if we're willing to look.
Have mercy on me, Lord, for I am in distress.
    Tears blur my eyes.
    My body and soul are withering away.
10 I am dying from grief;
    my years are shortened by sadness.
Sin has drained my strength;
    I am wasting away from within.
11 I am scorned by all my enemies
    and despised by my neighbors—
    even my friends are afraid to come near me.
When they see me on the street,
    they run the other way.
12 I am ignored as if I were dead,
    as if I were a broken pot.
13 I have heard the many rumors about me,
    and I am surrounded by terror.
My enemies conspire against me,
    plotting to take my life.
(verses 9-13) Yet, even though David has proclaimed God's faithfulness in the earlier verses (6-8), there's still more. He needs—and prays forcomplete rescue. He acknowledges what God has done up to this point and has hope that he will do even more, such as dealing with this whole list of hardships. This is encouragement to be persistent in our prayers, to not give up when we're asking for more of God in our lives.
14 But I am trusting you, O Lord,
    saying, “You are my God!”
(verse 14) Even though his circumstances are very hard (verses 9-13), still David has hope and trust in the Lord. He chooses to trust in God's promises and character rather than his circumstances!

15 My future is in your hands.
    Rescue me from those who hunt me down relentlessly.
16 Let your favor shine on your servant.
    In your unfailing love, rescue me.
(verses 15-16) I love this: "My future is in your hands." In saying this, we can presume that David trusts that since his future is in God's hands, that God can—and will—do something about it. David is not all on his own in this suffering. And I imagine that it's from that knowledge that he gets his hope, trusting that God can turn it all around and let his "favor shine on" him.
17 Don’t let me be disgraced, O Lord,
    for I call out to you for help.
Let the wicked be disgraced;
    let them lie silent in the grave.
18 Silence their lying lips—
    those proud and arrogant lips that accuse the godly.
19 
How great is the goodness

   
you have stored up for those who fear you.

You lavish it on those who come to you for protection,

   
blessing them before the watching world.
(verses 17-19) We see a call for justice. It makes me think that when he says "How great is the goodness you have stored up for those who fear you," he is connecting it with the justice he so desires in the previous verses. He trusts that justice will prevail and because of it, he professes that God's goodness is great. (I'm not 100% sure about that conclusion, but that's just my thoughts, piecing things together in context.) This call to justice reminds me of Psalm 29, where God's judgment—bringing justice to earth—resulted in praise and glory and cause to rejoice. (You can read more about my thoughts on that psalm here.)
20 You hide them in the shelter of your presence,
    safe from those who conspire against them.
You shelter them in your presence,
    far from accusing tongues.
(verse 20) Here, we see that it wasn't just that God keeps his people safe from harm, but that in doing so, he keeps them safe in the shelter of his presence. That is a much more incredible thing, because he's keeping us safe by drawing us so closely to himself that we are with him, in his presence!
21 Praise the Lord,
    for he has shown me the wonders of his unfailing love.
    He kept me safe when my city was under attack.
22 In panic I cried out,
    “I am cut off from the Lord!”
But you heard my cry for mercy
    and answered my call for help.
(verses 21-22) In keeping his people safe (verse 20), God is showing his unfailing love (verse 21). I'm curious whether this section was written as something of a post-script to all that precedes. Because it sounds as if in the calling, God answered and now he's providing an update about how God did save him when he cried out. Not sure of that, though...
23 Love the Lord, all you godly ones!
    For the Lord protects those who are loyal to him,
    but he harshly punishes the arrogant.
(verse 23) Because of what God did for him (because of God's faithfulness and trustworthiness), David calls everyone not only to praise the Lord but to also love the Lord. It almost seems as if he's saying to them, "Love him, because he can be trusted. I saw it myself! Let me tell you about it..."
24 So be strong and courageous,
    all you who put your hope in the Lord!
(verse 24) Sometimes, it's going to take strength and courage to put your hope in God. In the face of difficult and hard circumstances, it can be hard to trust God to act or to rescue or to even listen. It's not always going to be easy, and I think we all know that from some personal experience or another. But David calls us to find that strength and courage, to hold on for just a little bit longer, in spite of the circumstances at bay. Because God can be trusted. We will not be disappointed!

What else do you see in this psalm? What other insights or lessons do you find in it?

Related Posts
The Faith to Trust Where God Has Placed Us
My Testimony: Learning About God's Loyalty Firsthand
READ FULL POST >>

Bring Some New Life to Your Button-Up Shirts & Make the Most of Your Wardrobe


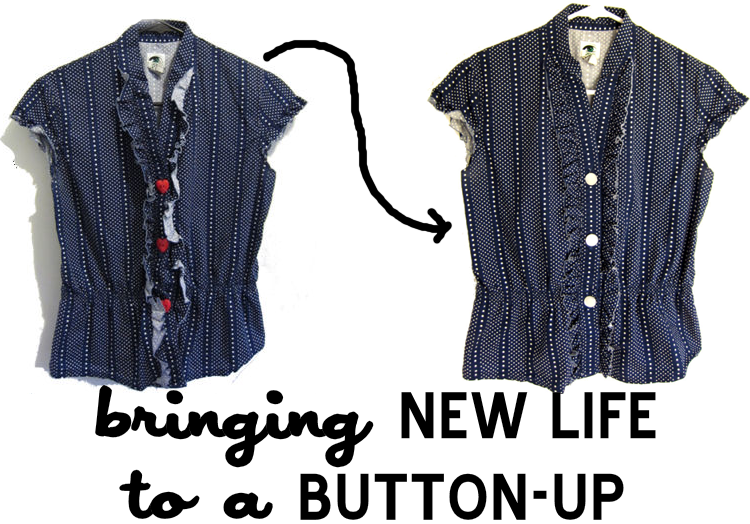
Sometimes, it only takes a couple of stitches to bring new life to your clothes. For this tutorial in the Making the Most of Your Wardrobe series, you don't even need a sewing machine!

I wanted to show how small changes—like swapping out the buttons on a top—can breathe new life into an article of clothing.

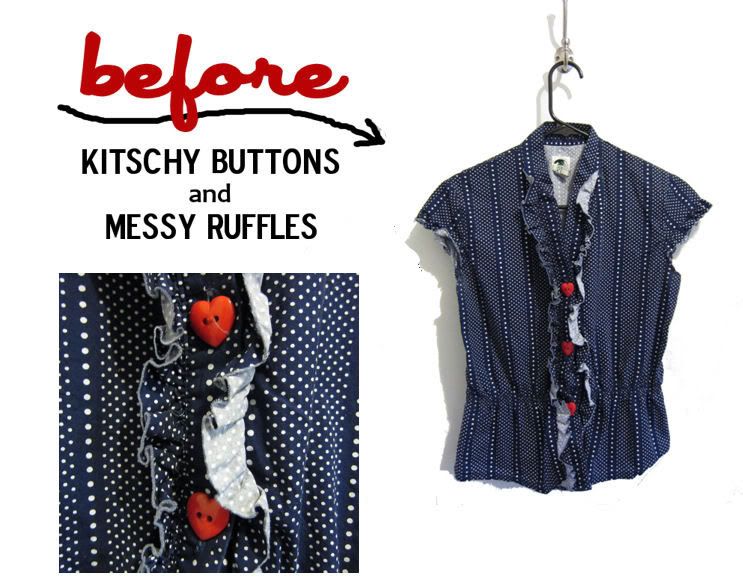
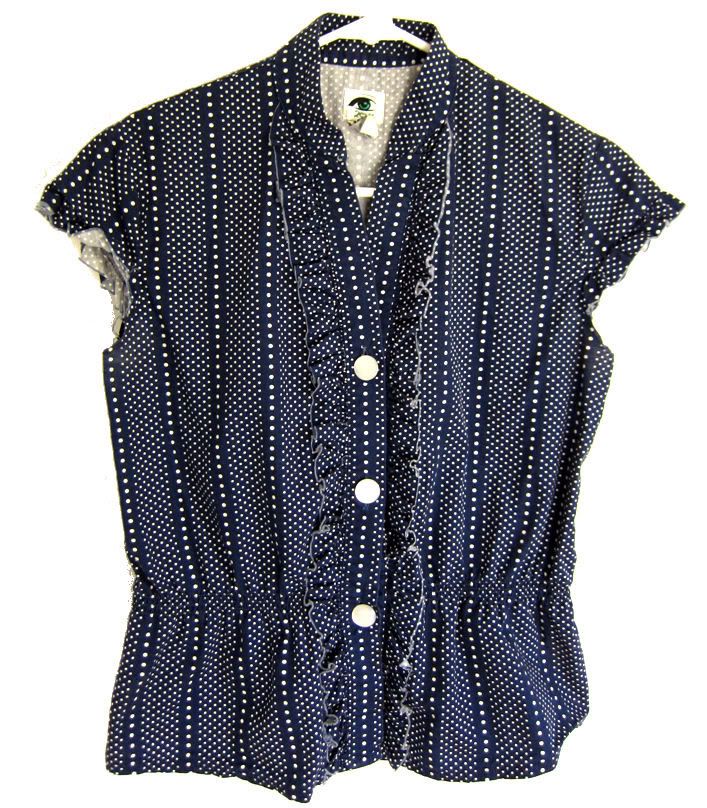
For instance, here's a top I've had for a couple of years but, while I loved the funky-ness of the heart buttons, I didn't like that it felt uber-patriotic against the navy-and-white polka dot pattern. I didn't like feeling like a walking American flag!


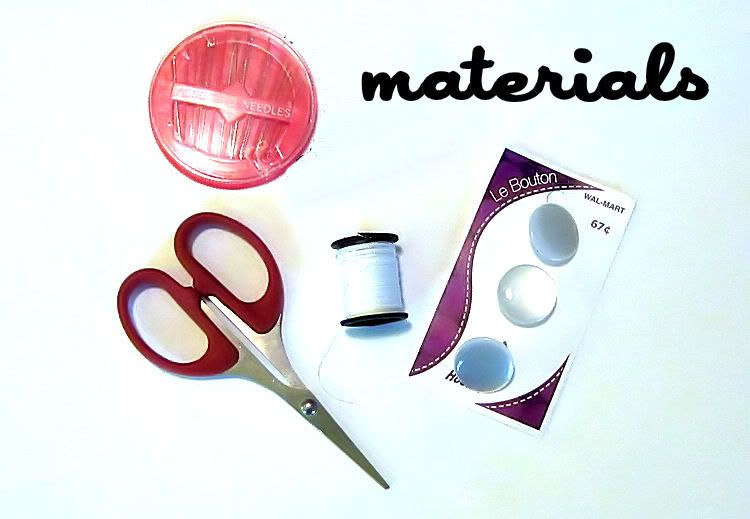
So I decided to find some more understated buttons to use to give the top the kind of laidback sophisticated style vibe I've been going for with my wardrobe. I picked up these pearlescent buttons for a whopping $0.67! (When picking out your buttons, try to aim for ones with a diameter as close as possible to the button-hole opening.)


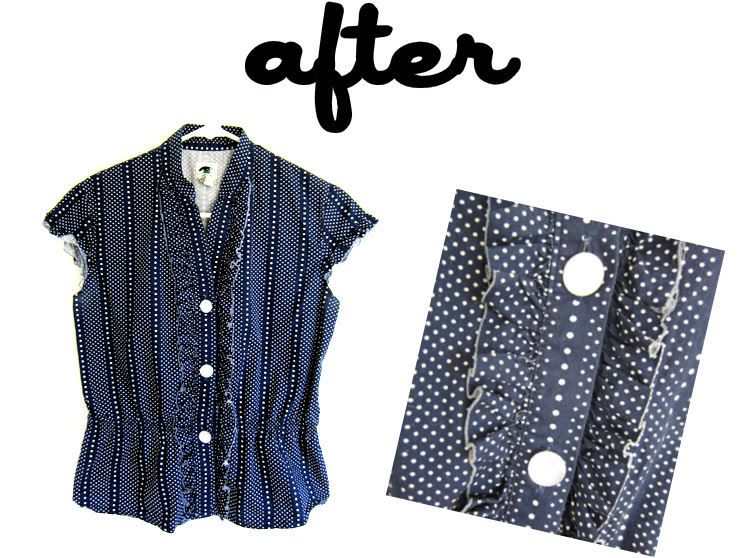
To get started, I carefully snipped off the old buttons (and added them to my button stash, because I totally plan on repurposing them!). And then, with a couple threads of my needle, I fastened the buttons to the shirt, making sure to place them in the same spots where the original buttons had been.

While I was at it, I also decided to stitch the ruffles on either side of the buttons down in place. (They never seemed to look decent, even after ironing them again and again.) Every inch or so, I just added a couple of tiny stitches along the ruffle, arranging the fabric as I went to get it to lay as naturally as possible. (For this part, I chose a navy thread that matched the blue of the shirt so it'd be nearly invisible.)

All in all, it took less than half an hour to make these simple updates, but look at the difference they made:


And, in case you've missed any, you can check out all the tutorials in the Make the Most of Your Wardrobe series here.
READ FULL POST >>

On Buying a Small House


The house my husband and I bought is big for us. We don’t even have enough furniture to give it that cozy, “lived in” look. Instead, it has something of an “empty” look about it with its bare spaces and empty cupboards.

In actuality, though, it’s only a three-bedroom ranch with no basement and only a garage for extra storage. To many folks, that’s rather small when you start talking about working from home and hoping to have kids someday. 

But to us? Well that was one of the things we loved about it.

You see, I don’t want a house that I feel like I have to fill up. I don’t want rooms that go dormant and gather dust. I don’t want spaces that beg for clutter and more stuff. 

Instead, I want a house that gets used. I want a house that is snug and that commands that we be careful with our purchases. I want a house that challenges me to use every inch wisely. I want a house that is small enough to maintain so that I can spend my time doing other, more enjoyable things. I've daydreamed about those benefits of a smaller home for awhile now.

Originally, when we were thinking about how large of a house we wanted, we thought four bedrooms would be ideal: One for us, two rooms for our someday children and another for an office/guestroom. But with one less room, we’ll be forced to get creative to make do when the time calls for it. 

And that part? I like it, too. 

I’m excited to see what lies ahead for this humble little abode of ours and how it will transform over the years. Because for me, bigger isn’t always better. 

Related Posts
READ FULL POST >>

Explore the Archives: June 2010 on Life Blessons


I'm still plugging away at manually creating a browser-friendly archives page for all my past blog posts, month by month. Here's a look at what was going on in my life, way back in June 2010. From a sweet post about how my husband and I first met (believe me, it was the antithesis of romantic!) to a nugget I gleaned reading one of my favorite books about the faith that still encourages me today, I hope you enjoy getting to take a little step back in time with me:

Archive Posts from June 2010

I'll share another post in a couple of weeks with the next installment of archives, but you can always jump ahead and browse all the posts in the archive.

Related Posts
Why I Keep Looking Back and Reminding Myself...

Thoughts on Change and Wondering What the Future Might Hold

READ FULL POST >>

My Secret Weapon to Decorating My House


Things around my house have been unpacked for months now. Furniture is in place, dishes are organized in the cupboards, clothes placed in a row on hangers.

But then there’s that whole aspect of decorating, which takes a lot more effort than just taking something from a box and finding a home for it. Decorating takes time and thinking about arrangements and tweaking each one until you get it right. It takes effort.

And too often—when there are dishes that need to be done and laundry to be folded and shoes to be put away—the last thing I want to do is try to figure out what I want to put into frames to fill that empty hole on the wall.

Of course, no one says you have to decorate. But, for me, it’s those little touches that make a house feel like a home. So I love decorating—when it’s complete and not necessarily the long, drawn-out process it takes to get there. Sometimes that can be so overwhelming that I just ignore it, put it off until later because there are other things that need to be done.

But I’ve found that one of the surest ways to conquer the apathy toward decorating is pretty simple: Invite people over. Invite people over before everything’s done, even before everything’s out of boxes or organized or looking presentable. Invite folks over, and I’ve discovered that out of nowhere, a desire to unpack and unfurl and hang and hem pops up out of nowhere.

And in just a couple of hours or days, so much more gets accomplished.

That’s what’s happening right now around my house. In a month, we’ll have family down for a week to visit. So the paint cans—which have sat untouched for a couple of months now, since we did our last bout of painting in the bedroom—came out and curtains are getting hung and artwork being made.

It’s not that there’s an expectation that we have to impress them—no, that’s not it at all. Everyone we’ve invited over have been true-blue kindred spirits who could care less whether anything matches.

Instead, I think it has to do with what I mentioned earlier, that decorating makes a house feel like a home to me. And so when those folks come over, I want it to feel like home to them, too.

And so, here I am, painting again…

Related Posts
The Process of Turning a House into a Home
Playing With Paint Colors: Choosing A Palette for Our Entire House
READ FULL POST >>

A Cleaning Schedule for People Who Hate to Clean


We all have our strengths and weaknesses when it comes to anything, even homemaking. Mine? Well, I enjoy making a lot of everyday stuff from scratch (from salsa to salad dressing). But housecleaning is not a strong suit of mine.

I do take care of the laundry and dishes and keeping the kitchen countertops and floors swept, but as most of you know, there’s a lot more to a clean house than just that! Everything else? Well, I kind of just don’t even notice it…

Which is why my husband actually ends up doing a lot of the deep cleaning around the house, from cleaning the tub to vacuuming the carpet. I mentioned before that it’s part of that “two are better than one” thing that happens in marriages: He takes it upon himself to take up the vacuum and the cleaning supplies while I handle the clutter around the house. Together, the house ends up looking well kept.

But, since my husband already spends more than forty hours a week slaving away, I really want our home to be a place where he can relax and a refuge for him after a long day’s work. It’s not that he really minds cleaning (I nabbed a good one, I tell ya!), but I just want to be more proactive.

So that’s why I started keeping a housecleaning schedule. But not just any schedule, where every day I have to take up a specific task like Mondays are for mopping or Tuesdays are for toilet scrubbing.


I’ve tried those kinds of schedules but found that after a day or two, I just get bored with them. And then abandon them completely and go back to my natural way of cleaning, which is that when it gets dirty enough to tell, I clean it. (But usually that just means that my husband tackles it before I get around to it!)

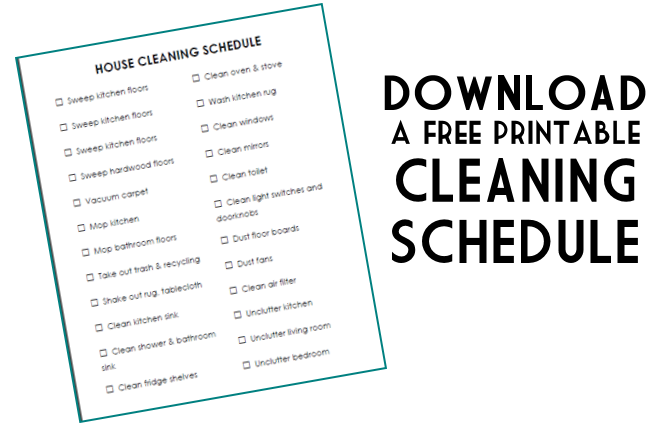
No, my schedule is one that takes advantage of my desire to mix things up. The beauty of it, in fact, rests on its flexibility. (Keep on reading if you want to download a printable copy of my schedule!)

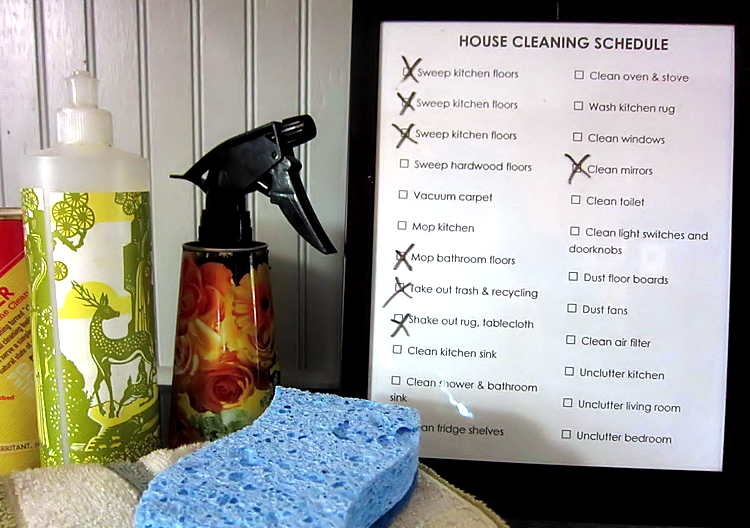
Because the way I have it set up, is that I have one list of all the cleaning chores that need to be done around the house that I normally never think of or get around to doing. Then, once a day, I’ll look over that list and decide what items I want to check off, depending on my mood or my ambition.

I have the list framed in a picture frame behind glass so that I can use a dry-erase marker to check off each item as I go, and then every Monday, I wipe the slate clean and begin again.

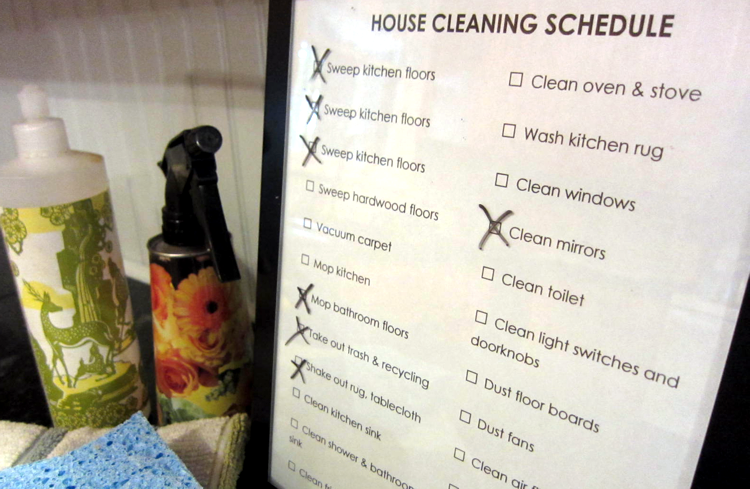
Here’s a closer look at my list:


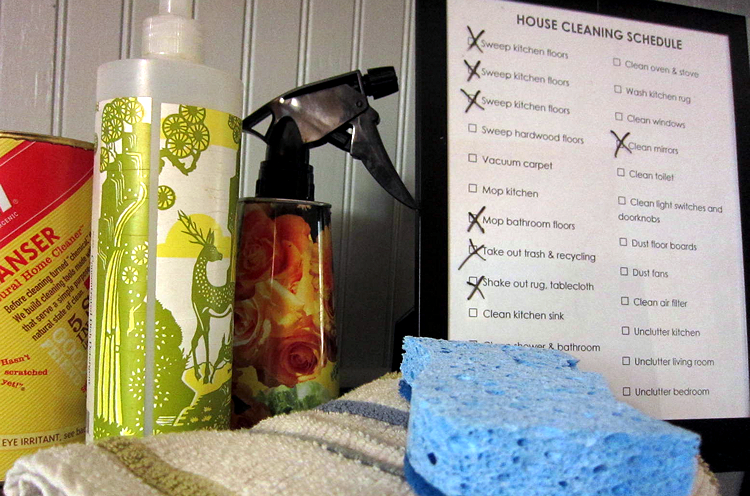
(By the way, you can check out some of my favorite cleaning essentials  here.)

You’ll see that my list isn’t completely comprehensive. That’s because I left off the chores that come naturally to me—like laundry and dishes and countertop cleaning. I already do those routinely, so I don’t need to be reminded by a list to stay up on them. You’ll also see that there are some things that are on there multiple times (like sweep the kitchen floors), because I want to make sure they’re swept at least that many times a week and otherwise I’ll go for longer between grabbing my broom.

The goal isn’t to complete everything on the list every week. The air conditioning filter only needs to be cleaned once every three months, after all. But since it’s on the list, then I can’t forget about it and can aim to repeat it every couple of months. So by tackling a couple of those seasonal or once-in-awhile jobs every week or two, they’re all taken care of in turn.

The thing about this list is that it works so well because if I didn’t have “Clean mirrors” staring me in the face, I probably would not have taken up my spray bottle and newspaper and spent thirty minutes going from room to room, wiping down each looking glass. But because of this list, I did.

If you want, you can download a PDF of my list here. It’s tailored specifically for my home and for my cleaning needs, but it can be a good starting point for any small home or just to inspire you to make your own list.


P.S. If you are new to this blog, thank you so much for stopping by! You can feel free to browse all my other posts about my journey toward a lifestyle of simplicity and DIY, as well as some of the ways my husband and I are learning to save money. I also write about my faith, my marriage and everything in between, which you can explore in the archives.

Related Posts
Dishes and papers pile up, and I'm okay with that...
A Few of My Favorite Things: Cleaning Supplies Edition

READ FULL POST >>

Update About How My Freelance Writing Is Going


It’s been awhile since I’ve made any mention about how my freelance writing is going. (I think the last update I made about it was in this post. And here’s where I talked about the genesis behind this new career of mine.)

It’s been more than a year now that I’ve been freelance writing, and I’ve published a dozen or so pieces in print and online outlets. Most of them have all been for the design magazine I used to work for, which notably included my favorite assignment to date which was getting to interview the designers at Etsy and write about their creative approach to business and design. That article is only available in the print issue, but you can read an online exclusive I wrote as a companion piece to that story here.

At first, when I started out pursuing the freelancing gig, I was pitching myself left and right, brainstorming ideas, scouting new magazines, looking up magazine’s pitch guidelines—basically getting gung-ho to take this thing seriously.

It started off well enough but there weren’t many magazines that were biting the stories I was pitching to them. It seemed like a lot of work for little return, which was admittedly disappointing.

Then we bought a house and I didn’t have time to keep up the steady pace of pitching and pursuing, so I let that aspect slide and just took on new assignments with the couple of magazines that I’ve been working with. And even though we’ve been in our house for almost six months now, I still don’t seem ready to go back to that feverish pace.

There’s still plenty to do around the house, which keeps me busy enough. And then, when there is downtime, I like to spend it on the kind of writing I like best, which is writing for this blog.

Fortunately, my husband is fully on board for me to do what freelance writing comes my way but not feeling the need to be chasing down every lead and forcing the freelance thing. We’ve set our finances to live off of his salary alone, so that takes a lot of the pressure off me and makes it so that when I do get a paid assignment, it’s all extra, which has been great for financing some of our, uh, extras of late.

Even though I had high hopes for my freelancing career, which never took off quite as I’d hoped, I’m actually enjoying this season and the slower pace that’s come with it. In fact, I think that’s just what I needed after all.

Related Posts
Why I Started This Blog
Let's Try Something New, Shall We?
READ FULL POST >>

How to Hem Your Jeans to the Perfect Length and Make the Most of Your Wardrobe

Finding jeans that fit can be a difficult enough task without trying to get them the right length, on top of fitting every other part of your body. Fortunately, though, hemming your jeans is really simple and one I've done multiple times.

This tutorial is pretty simple, simply measuring, pinning and sewing a straight line. I've seen (and tried) much more complicated tutorials for hemming jeans (including keeping the original hem in place) but I was never satisfied with those. (The one for keeping the original hem in place? It looked great...until I washed the jeans and then it was always too wonky, so I never wear them anymore.)

Like they say, less really is more, sometimes.

So, without further ado, the latest tutorial in the Make the Most of Your Wardrobe series (and you can check out all the tutorials here if you've missed any).
 
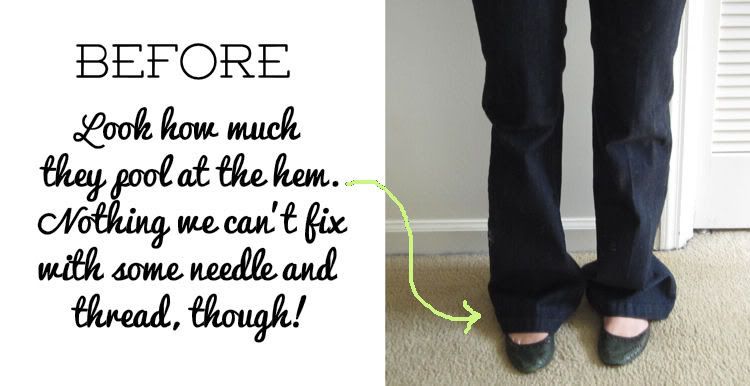
First, you'll need to find some pants (obviously they don't have to be jeans, but that's what I end up hemming most of the time!) that are too long. Here is the pair I chose for this tutorial:


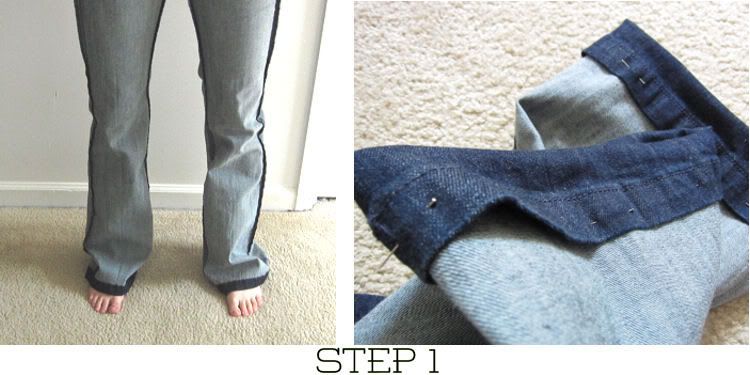
Step 1} The first thing you'll need to do is turn your pants inside out. Then, try them on and fold them up (just once) at the point where you'd like the new hem to hit. Pin them in place. Make sure to keep the cuffs even and straight on both sides.


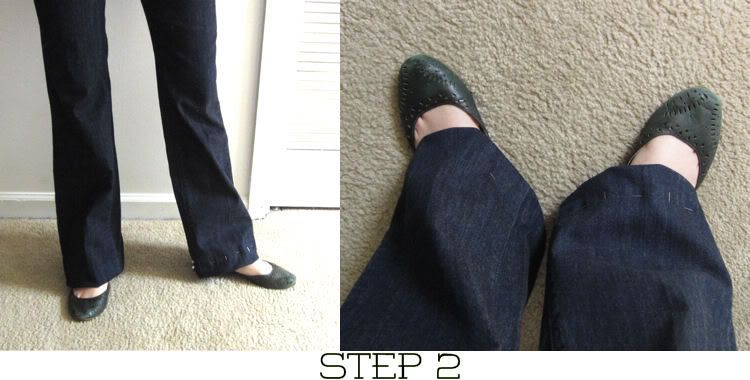
Step 2} I am a big believer in double-checking your work (always served me well in math class, too!), so I'd recommend turning the jeans right-side-out and trying them on to make sure that you're happy with the hem placement, being sure not to poke yourself on the pins. If the hems aren't lined up or don't hit exactly where you want, take the time now to remove the pins and go back to step one, tweaking until you get it looking just right. Your patience and persistence will pay off in the end! Once you're ready, turn the pants inside out and get ready to start sewing!


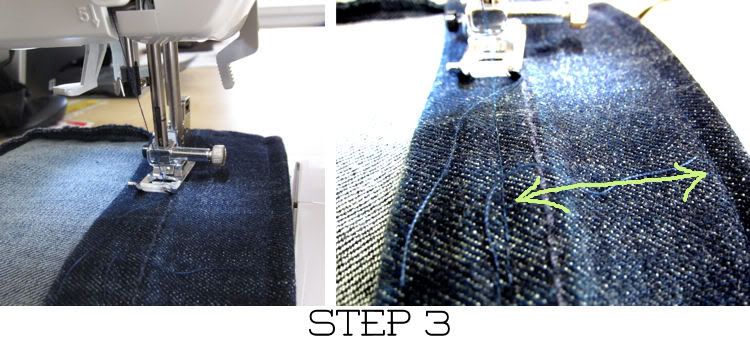
Step 3} One of the key elements to a successful hem job is using thread that matches your pants as close to perfectly as possible. You want the thread to disappear into the fabric and barely be noticeable. Compare a variety of thread colors until you find the closest match!

With that in place, set up your sewing machine. (Here’s a newer version of the sewing machine I have. It’s computerized so it makes everything so much easier!)

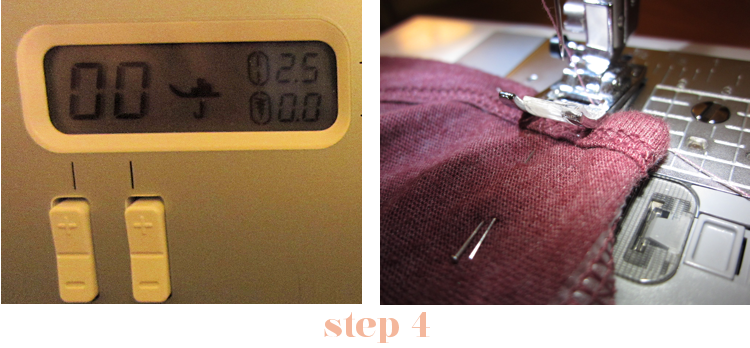
Starting at one of the edges where the front and back of the pants meet, sew a straight line either just above or just below the original bottom of the hem. (In the pictures above, you can see that I sewed just above the original hem, but your original hem might be skinnier, in which case I'd recommend sewing a new line just below that.)

Because my new hem was pretty wide, I also sewed a second line about a quarter of inch from the bottom of the new hem. (Visible in the right-most stitching in the photos above.) I did this just to ensure that the new hem would lay flat and crisp. If you're only hemming your pants a little bit, this isn't necessary and is purely optional.


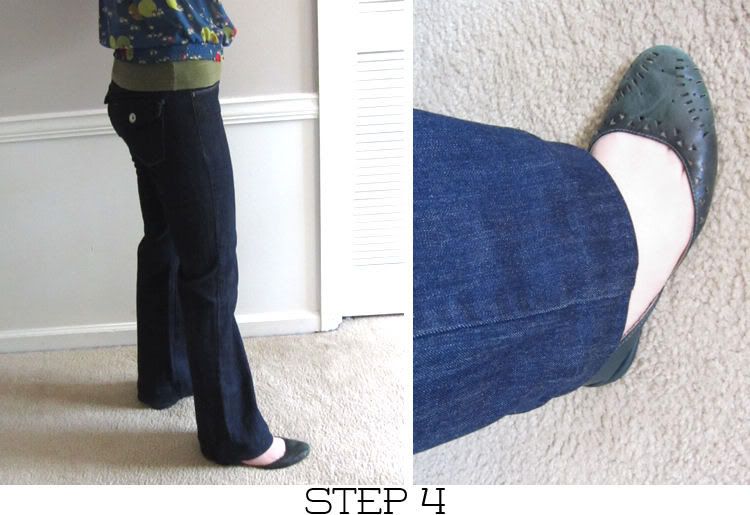
Step 4} Turn your pants right-side-out and check out how you did on your hemming job. If you aren't happy with how they turned out, you can always use a seamripper and carefully pull the stitches out and start over. It might be time-consuming, but it's worth it to get it right!


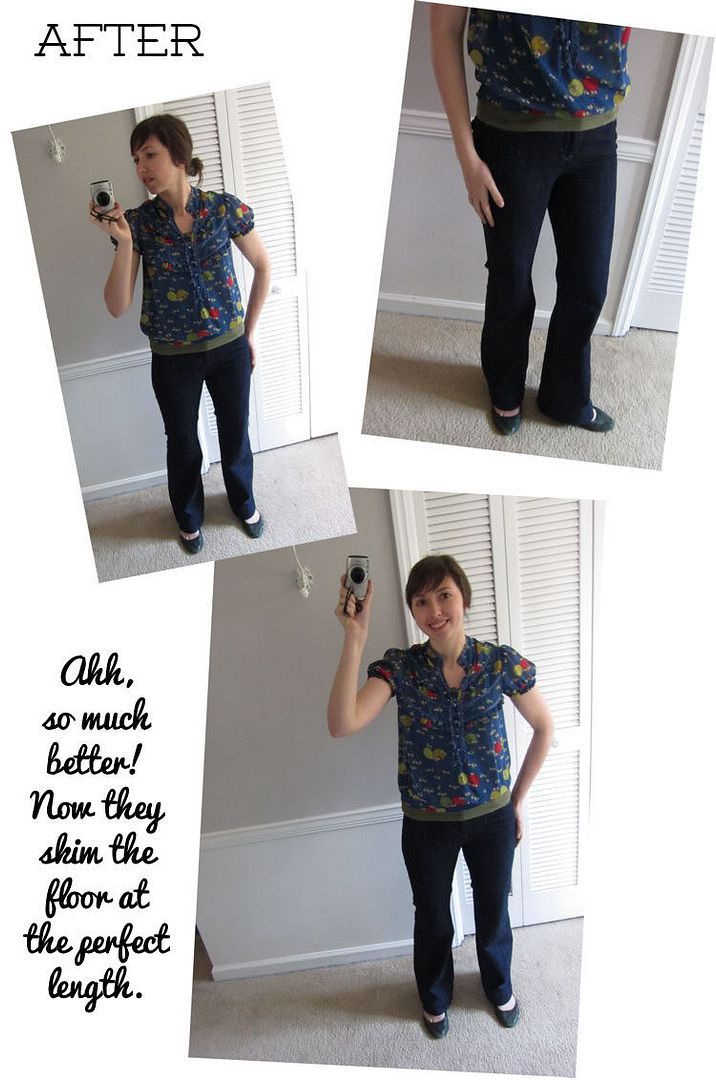
Finally, admire your new jeans! If you like this tutorial, you can bookmark it on Pinterest. You can also follow me on Pinterest here.
P.S. If you are new to this blog, thank you so much for stopping by! You can feel free to browse all my other posts about my journey toward a lifestyle of simplicity and DIY, as well as some of the ways my husband and I are learning to save money. I also write about my faith, my marriage and everything in between, which you can explore in the archives.

If you like this recipe, click here to pin it to Pinterest. You can also follow me on Pinterest here.  


Related Posts
I've got a sewing itch that needs scratching...
Shopping My Closet for Crafts


READ FULL POST >>

A History of Rain in My Life (Or, Why I Enjoy Thunderstorms)


Lately it’s been raining a lot here.

Raindrops pitter-patter down. Puddles pool. Miniature ravines flow through the cracks in the dirt and cascade around pebble-sized boulders, bending the blades of grass that get in their way.

Branches droop under the sopping weight of the misty-eyed droplets, and leaves shine bright like polished silverware beneath the glistening sheen of fresh rain.

And I stand at my kitchen window and watch it all unfold.

There’s something soothing about the rain, the rhythmic songs it sings as it slaps the ground and fills the gutters. For as long as I can remember, I’ve always invited the rain. Looking at the skies turning gray and the winds turning cool and hoping that the rain is on its way.

When I was younger, my parents would let us sit on the front porch when it was raining. We had a porch swing out there, where I’d sit and watch the strings of droplets fall down like crystals all around me.

And when it began to thunder, we took no fear because my parents insisted that it was just the angels bowling and a clap of thunder was when one got a strike! We would yell and cheer and invite the thunder to boom again. Even now, I smile when I hear thunder rolling in.

I went to college at a school where you walked everywhere, even in the rain. Couched in the foothills of the Appalachian mountains, it seemed that storms would find a way to settle over our little utopian university and stick around awhile, taking their time before passing through.

So much so, that in freshman orientation they advised each student to bring three umbrellas because you’d invariably go through that many. I got used to the routine of rolling up my jeans and learning to ignore the puddles that splashed my ankles as I made my way to my classes. It became something of a rite of passage, slopping your way across the cobblestone streets and kicking up dirty water as you went.

Over the years, rain has become soothing, something of a balm to my soul.

You know how sometimes, you just need a good cry? How there’s something cathartic when the tears fall? The rain does that for me. As it cleanses the ground and the cars and the sides of buildings, so it cleanses my spirit. The old and dirty and haunting yesterdays get washed away. Everything becomes fresh and new again as the clouds trail past.

There’s a Misty Edwards song that goes, “I’m waiting in this desert, just waiting for the rain. I’m waiting in the wilderness of promises yet fulfilled. I won’t leave this wilderness until I see the rain. I’m waiting for the rain…”

Because as surely as we know the rains will come, we also know they will pass. We know what lies beyond them, the Hope—that ever-present rainbow looming in the distance—that awaits us and points us to a new day.

As the lyrics continue, she sings, “I can see the clouds gathering now. Are you ready for the rain? Open up the heavens, and let it rain!”

I’m ready. Let it rain.

Related Posts
When I was Young: Remembering what Jesus was like to Me as a Child
Seeking Simplicity: Cutting Back Time Wasted Online
READ FULL POST >>

A Few of My Favorite Things: Craft Supplies Edition

These are A Few of My Favorite Things, an on-going, once-a-month series that sheds some light on, well, my favorite items throughout my home. (To read through all posts in the series, click here.)

In this Craft Supplies Edition, I'll be looking at five of the essential items that I turn to most in my various craft projects. As we work our way through the Make the Most of Your Wardrobe series that I kicked off a couple of weeks ago, I thought sharing these would be particularly fitting! Read on to find out more about these crafting, ahem, staples, as well as some of the projects where I've put them to good use.


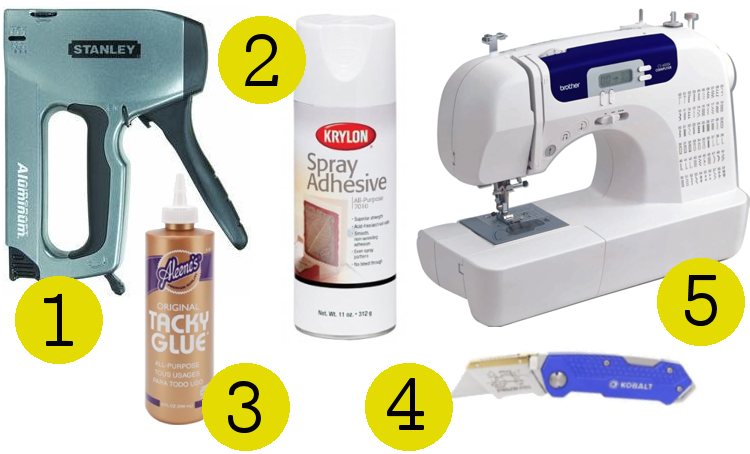
1. Staple gun: My parents got me this staple gun a couple of years ago when I wanted to reupholster my kitchen chairs. After a short safety lesson from my dad on how to use it, I got to work using it--and haven't really stopped since. It's such a great tool to have around especially for securing fabric, cardboard or paper. I love using it for framing artwork!

2. Spray adhesive: You'll see that I have two adhesives on this list. That's because I do a fair amount of gluing when it comes to craft projects. But different projects require different kinds of glue, and I love to use spray adhesive for instances where I don't want any glue to bubble up and show through, especially when using paper. I used it when I created the silhouette art for my bedroom to keep the silhouettes centered on the mats.

3. Aleene's craft glue: I have been an avid Aleene's fan since I was in elementary school and my mom and I would use it to bejewel my backpack or Trapper Keeper before school started up again. The thing I like most about this glue is that it gives a pretty sturdy hold and dries clear. I used it on my Billy Ball faux flower craft and when I made my corkboard travel map. (Note that this glue isn't meant for washable wearables. They do have other glues that can hold up to being washed.)

4. Utility knife: Some people call it a box-cutter, but whatever the term you prefer, this tool always comes in handy, whether I'm using it to cut big pieces of cardboard to prop up posters I want to frame (like here) or even to slice through fabric. It has some good safety features (folding up when not in use, for example) and the blade is really easy to switch out, though I only switch mine about once a year.

5. Sewing machine: This is one of the biggies in my craft closet. I have very limited sewing instruction and am mostly self-taught, so this computerized machine (although I have an older version of the one linked here) is a great help. If you've ever struggled threading the needle or bobbin, this really simplifies the process. And, I recently used its buttonhole feature for the first time and it literally did everything for me. Amazing! I have used this on almost all of my sewing projects, which you can browse in the Make the Most of Your Wardrobe series I'm currently posting.

You can view all of the previous editions of A Few of My Favorite Things here, including ones about my favorite gadgets to use in the kitchen, coffee-making supplies, books about love, and more!
READ FULL POST >>

Walking Through Scripture: Psalm 29


At the beginning of the year, when I was doing a mini-series on Bible study, I mentioned that instead of following a pre-made Bible reading plan (like the chronological one I did in 2011), I was going to slow down and read slowly through a couple of books of the Bible.

Right now, I’m making my way, bit by bit, through the Psalms. And I thought that every once in awhile, I might share what I’m reading and taking away from some of these passages.

I’m no Bible scholar, but I have made an effort to include notes from various commentaries in my studying, some of which I’ve included below. I’d encourage you to take anything you read here and study it on your own, in light of the rest of Scripture and let the Holy Spirit speak to your own heart about it.

First up, Psalm 29 (using the New Living Translation):

Psalm 29

A psalm of David.

Honor the Lord, you heavenly beings;
    honor the Lord for his glory and strength.
Honor the Lord for the glory of his name.
    Worship the Lord in the splendor of his holiness.
The voice of the Lord echoes above the sea.
    The God of glory thunders.
    The Lord thunders over the mighty sea.
The voice of the Lord is powerful;
    the voice of the Lord is majestic.
The voice of the Lord splits the mighty cedars;
    the Lord shatters the cedars of Lebanon.
He makes Lebanon’s mountains skip like a calf;
    he makes Mount Hermon leap like a young wild ox.
The voice of the Lord strikes
    with bolts of lightning.
The voice of the Lord makes the barren wilderness quake;
    the Lord shakes the wilderness of Kadesh.
The voice of the Lord twists mighty oaks
    and strips the forests bare.
In his Temple everyone shouts, “Glory!”
10 The Lord rules over the floodwaters.
    The Lord reigns as king forever.
11 The Lord gives his people strength.
    The Lord blesses them with peace.
 

NOTES FROM COMMENTARIES AND OTHER RESOURCES:
  • This Psalm is attributed to David and may have been written upon seeing a thunderstorm in action, possibly ending a famine that had been in effect for three years (mentioned in 2 Samuel)
     
  • There’s some debate about whether the phrase “sons of God” in verse 1 is accurately translated as “angels” (or “heavenly beings” as it is here). Some think that it might be more accurately referring to all of God’s followers, including people as well. Personally, I like this thought more, because then the psalter is talking directly to me.
     
  • The violence of the storm may be an allusion to the End Days, when God will bring judgment to the earth. This is compounded by the use of the word "floodwaters" in verse 10, which is only used elsewhere in Scripture when referring to the flood of Noah, when God was exacting judgment on man’s wickedness.
     
  • Some versions of the text (in the Septuagint, specifically) note that this psalm might have been used during the Festival of Booths. (That festival was when the Jewish people remembered how God protected them when they lived in the wilderness in tents and looked forward to the day when God would redeem them again, this time with the Messiah.)

MY THOUGHTS ON THIS PASSAGE:
  • The most beautiful part of this psalm to me is this: Almost the entire psalm is talking about how God is powerful over all the earth. He conquers the trees and the mountains and the desserts and the weather. Specifically, these are the things that we cannot conquer and that, typically, are intimidating and threatening to us as humans. We see God crushing all these things that can crush us. But then, at the very end, we see this powerful Being turn and deal with us with such kindness, imparting his own strength and peace to us. He could crush us much easier than crushing a mountain or a giant tree, and yet he doesn’t. He lifts us up, closer to him. That picture is unfathomable to me, and perhaps that’s part of the point of the psalm, to draw that dichotomy between those two images.
     
  • We also see that it is by his voice alone that he can accomplish all this destruction. He need not even lift a finger. It calls us back to Genesis where he speaks everything into being—and here we see his voice calling much of it away. If his voice can do that much, what about when he lifts his entire body and comes to earth as a man?

  • When the people see God’s power and glory, they come together with one voice and shout, “Glory to God!” If the note that this psalm is hinting at God’s impending judgment on the earth is true (see note #3, above), then it seems that we should rejoice at that judgment to come and that it is through that judgment, perhaps, that we see his glory, get strength from him and find peace.
What else do you see in this psalm? What other insights or lessons do you find in it?

Related Posts
Making the Psalms Your Own
Selecting a Study Bible, Plus Reviews of the Versions Me & My Husband Use
READ FULL POST >>

Explore the Archives: May 2010 on Life Blessons


I'm still plugging away at manually creating a browser-friendly archives page for all my past blog posts, month by month.

Here's a look at what was going on in my life, way back in May 2010. From a manifesto on what going green looks like for me to one of my favorite prepare-ahead-of-time recipes, I hope you enjoy getting to take a little step back in time with me:

Archive Posts from May 2010
 I'll share another post in a couple of weeks with the next installment of archives, but you can always jump ahead and browse all the posts in the archive.

Related Posts
A look back at my first 100 blog posts
My Favorite Websites of Late 
READ FULL POST >>

Homemade Pizza Bites Recipe

One of my favorite things to do in the kitchen is to learn how to foods that typically aren't very good for you and make them so that they're not only healthier but, oftentimes, even better than the storebought version. (You can check out my homemade corndogs and my homemade vegetarian fish sticks for examples.) ...


One of my favorite things to do in the kitchen is to learn how to foods that typically aren't very good for you and make them so that they're not only healthier but, oftentimes, even better than the storebought version. (You can check out my homemade corndogs and my homemade vegetarian fish sticks for other examples.)

So it was when I decided to make my own pizza bites.

I can't remember the last time I had pizza bites—late night during college, likely. But I do remember that they were never really that good.

But one night, when my husband was gone and I couldn't justify whipping up an entire pizza for myself, I got an itch to try to make my own. I'd picked up a package of wonton wrappers at the store, and figured they'd make good candidates for the process. So, with some of my homemade pizza sauce, pizza seasonings and cheese, I got to work.


Admittedly, they're more time consuming to make from scratch than the open-a-box-and-pop-'em-in-the-microwave variety. But I'd say the effort is worth it, with mini pizza bites that you can whip up for dinner tonight and freeze any leftovers to bake for a quick go-to meal in the future.

Here's how I made mine:


Ingredients
- One package of square wonton wrappers
- About 2 cups of pizza sauce (here's my recipe to make your own pizza sauce)
- About 2 cups of cheese
- Olive oil
- Pizza seasonings (here's my recipe to make your own pizza seasoning mix)

It's best to only work on a couple of pizza rolls at a time, as the wonton wrappers can dry out if left out in the open air for too long. So, first, take a couple of wonton wrappers and lay them out on your workspace. You'll want to keep a small dish of water handy, too.

Using a spoon, put about a tablespoon of pizza sauce into the middle of each wonton wrapper. (Use more or less, depending on how much sauce-to-cheese ratio you prefer.) On top of the sauce, add about a tablespoon of cheese.

Dip your finger into the water and wet the edges of the wonton wrapper. Fold the wrapper in half along the diagonal so that, folded, it looks like a triangle. Press around each of the edges to seal shut. (If a lot of sauce or cheese oozes out, you've used too much and need to readjust your ratio.)

Place wontons on a baking stone (here's the one I use) and cover with a dish towel to keep from drying out. (Alternatively, if you want to put them in the freezer for later use, place directly on a piece of wax paper atop a freezer-ready dish. If you do freeze them, you can take them directly from the freezer when you're ready to bake them and proceed to the next step.)

Then, spritz each wonton with some olive oil. (I like to use my Misto for this step!) Top with about ¼ teaspoon of my pizza seasoning mix on each pizza roll. (Alternatively you can use a dash or two of sea salt, freshly ground pepper and Italian seasoning.)

Bake the wontons at 350 degrees for about 20 minutes or until the edges start to turn a golden brown. Remove from the oven and let cool for 5 minutes or so; they'll continue to darken a bit once you've removed them so don't let them get too dark in the oven!

Serve them with a side dish of pizza sauce for dipping. I like to serve about 6 pizza rolls per person, but you can adjust that to how hungry you are! Makes an entire package of wonton wrappers, about 48 in a 12 oz. package. (You can also use round wonton wrappers, but they're smaller so you'll have to adjust the amount of sauce and cheese you use on each pizza bite accordingly.)


Related Posts
My Recipes to Make Your Own: Pizza Dough & Pizza Sauce & Pizza Seasoning 
A Few of My Favorite Things: Cooking & Baking Edition
READ FULL POST >>

Misconceptions in Blogland


The other day I was trying to pass the time until my husband got home from work. I was looking up recipes and reloading Pinterest when something popped into my head to visit a blog I used to read but had unsubscribed from a year or so ago. (You can read more about why I unsubscribed from that blog—and a bunch of other ones—in this post.)

It was a blog with pictures of happy days spent strolling the streets, wearing cute clothes, perfect make-up and what seemed like a wish-you-were-here kind of lifestyle.

But as I started reading through recent posts, it became evident that something had changed. The façade had shattered.

The thing is, I was shocked by it. I had really bought into the idea that her life was great and, well, probably better than mine. I mean, did you see those shoes? That weekend? That meal? That vacation?

Without even realizing it, I’d bought into the idea that what I saw on the screen was all there was to it. Hardships must not exist. Feelings of loneliness or jealousy never plague. Cross words never pierce the days or make you wish you could hit the “undo” button. The folks on the other side of the screen? They're never the ones wishing for something different.

Of course, though, we know that in reality, that is far from true.

I don’t think the blogger ever set out to make her life appear perfect or always happy or better than mine, but somehow, that’s how it always felt to me. Which is one of the reasons why I stopped reading it.

As I plumbed through her posts, I realized that because you read my blog, you’ve probably fallen into that trap, too, and made some of the same kinds of misconceptions about me.

I really try to keep this place real and share some of my weaknesses and how the Lord is redeeming them. I try to be up-front about the fact that I don’t have it all together, whether it’s in my cooking or my cleaning or my self-confidence in Christ.

But of course this blog is only a small, piecemeal snapshot of my life, one that has been edited and refined and stitched back together in places so that it makes sense. And so it’s likely—it’s almost certain—that you’ve stitched together your own idea of who I am that bears little resemblance to the real thing.

You probably think I’m way nicer than I am. You probably think I love God more than I do. You probably think I’m a better cook or a better wife or a better friend or a better daughter than I am. You probably think a thousand different things about me that I really do wish were true but probably are not. In all reality? I’m probably a lot more like you than you realize.

And that’s probably a good thing, don’t you think?

I say all this because as I realized the false perception I’d made about this other woman—whose life I’d imagined was better than my own—I realized that what I was doing when I read her blog was that I had been comparing myself to her and came away thinking that I was ending up with the short end of the stick. That I was lacking in comparison to her.

That’s simply not true. Not for me and not for you.

Don’t let a fake version of me make you feel like you’re less of a Christian or less of a good wife or less of a whatever. Know that somedays I hate reading my Bible and somedays I’m mean to my husband and somedays I just want to crawl into bed and take a do-over. I am making every effort—with every prayer—to make those days fewer and more far between, but, like a pebble poking you in your favorite pair of shoes, they always return.

Friends, this is real life. I’m messed up, just like you are. And that’s probably a good thing, don’t you think?

Related Posts
Getting a Pep Talk from God
The Truth About My Inadequacies: A Lesson from the Old Testament
READ FULL POST >>

How to Fix a Low-Cut Top and Make the Most of Your Wardrobe


I’m so excited to kick off this new series, Make the Most of Your Wardrobe, with one of my standby alteration techniques!

There are so many times when I’ve come across a shirt that fits me in so many ways—the perfect color, a good price and not too tight or too baggy—but is too low-cut for my tastes. That can be such a bummer. But fortunately, it doesn’t have to be.

If everything else about the shirt is right but the neckline dips too low, usually fixing it is as simple as a single stitch.

I’ve used this alteration technique multiple times and, in doing so, taken a shirt that would have otherwise been condemned to the back of my closet or to a life of layering and given it a second chance in my wardrobe.

Let me show you how you can do it, too.

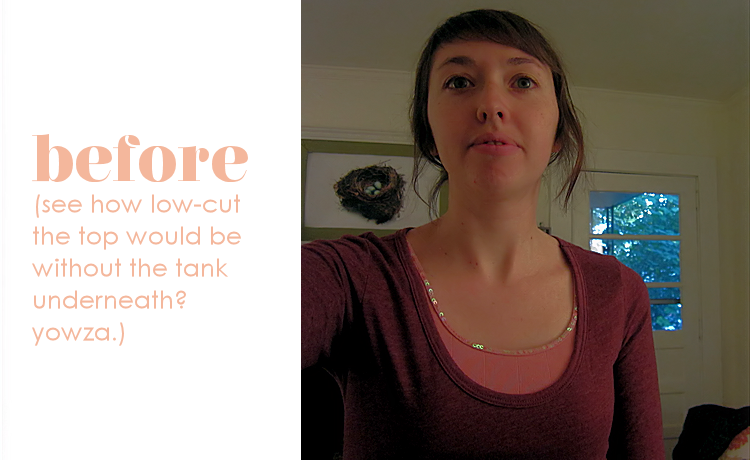
First up, the prerequisite before shot of the shirt I’ll be using for this sewing tutorial:


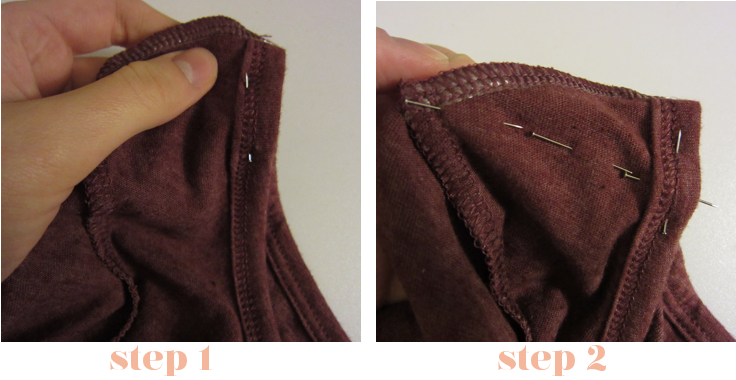
1. Using a top that is lower-cut than you’d like, turn it inside out and lay it on a flat surface. Hold it at the top of the shoulder seams and smooth it out flat. Place a pin along the neckline near each shoulder seam so that they stay lined up.


2. Next, you’ll want to pin a straight line from the corner of the shoulder seam to the neckline. The farther (or deeper) down the neckline you take this line, the more material you’ll be removing and the higher up you’ll be pulling the neckline. So if the neckline is only a smidge lower than you want, this line should only go a short ways down the neckline. I wanted to take off about an inch and a half, so mine is deeper.

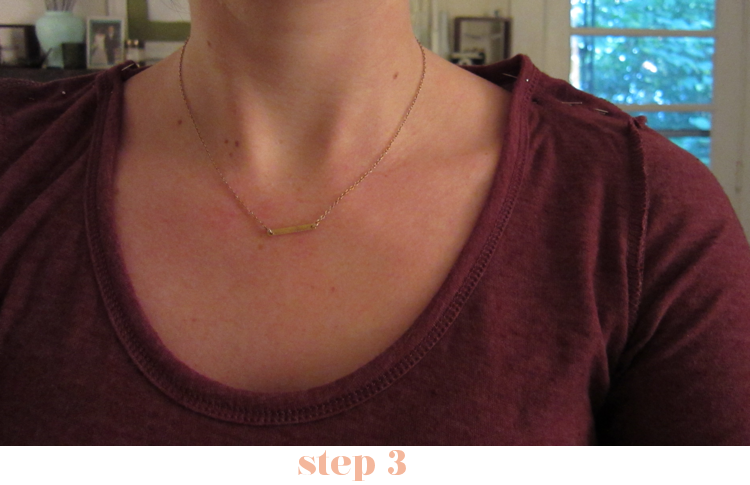
3. Once you have your pins in place, I’d recommend trying the shirt on (keeping it inside out) and being careful not to prick yourself. Once it’s on, make sure that you’ve placed the pins properly and that the neckline falls where you want. (I put a necklace on to help me judge where I wanted the new neckline to fall.) If necessary, unpin and repeat steps 1 & 2. It’s better to take the time and get it looking right now rather than once you’ve already sewn it in place!


4. Now it’s time to sew. You’ll be sewing along the line that runs from the neckline to the shoulder seam (keeping the shirt turned inside-out), and I’d recommend starting at the neckline. I just used a standard straight stitch and you can see the settings I used on my sewing machine in this photo:


Depending on the type of fabric you’re using, you might need to adjust your tension and length settings accordingly.

(By the way, here’s a newer version of the sewing machine I have. It’s computerized so it makes everything so much easier!)

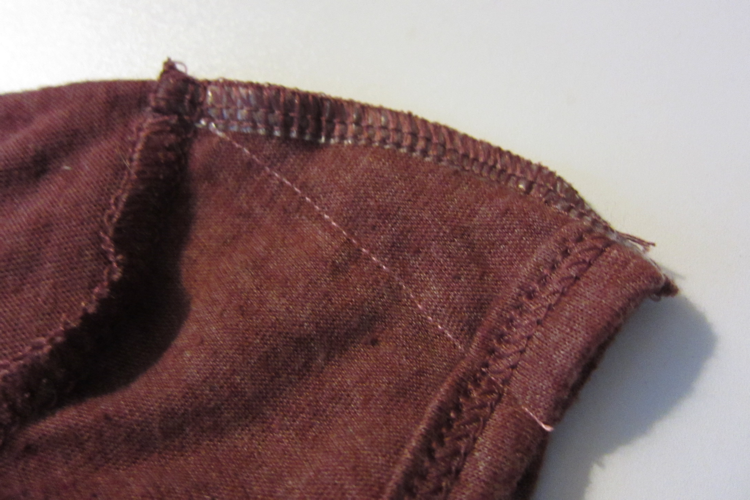
5. Once you’ve finished stitching the line from seam to seam, you can clip the thread and remove the pins. Your shirt should look like this:


Now, flip the shirt right-side-out and try it on, to make sure you’ve sewn it correctly and it fits how you want. (If you have made a mistake, you can use a seam-ripper to carefully remove the stitches and start over. It might take a little while, but it’s doable!)

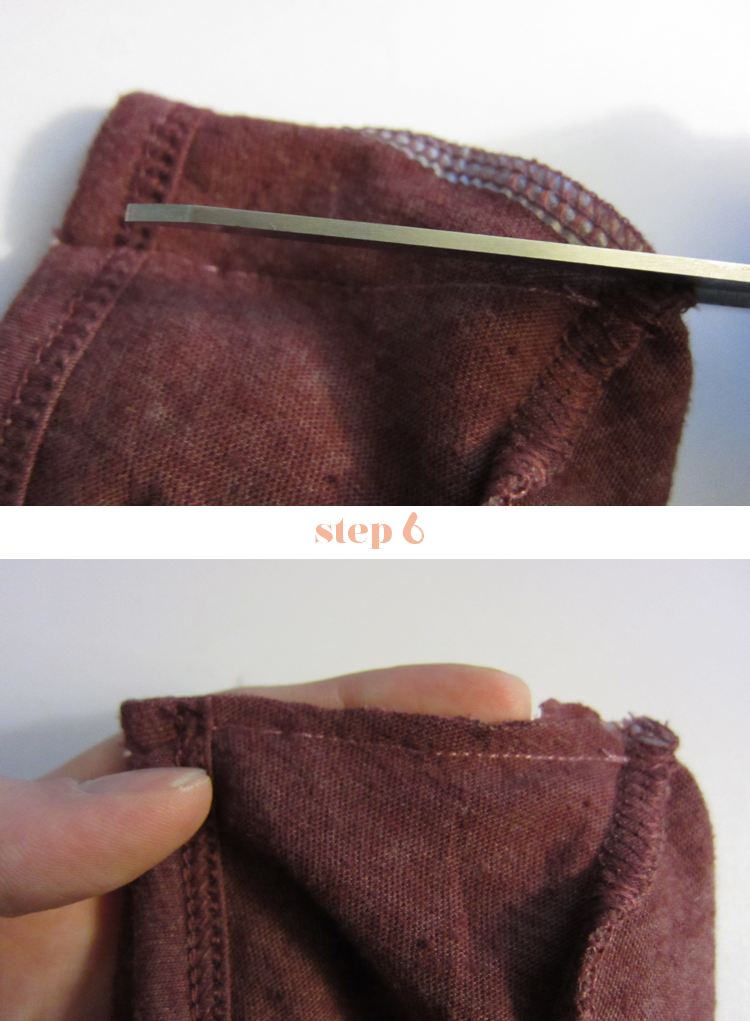
6. Once you’re happy with the stitches, take a pair of scissors and cut off the excess fabric. Make sure that you cut off the material above the stitch you just made, like this:


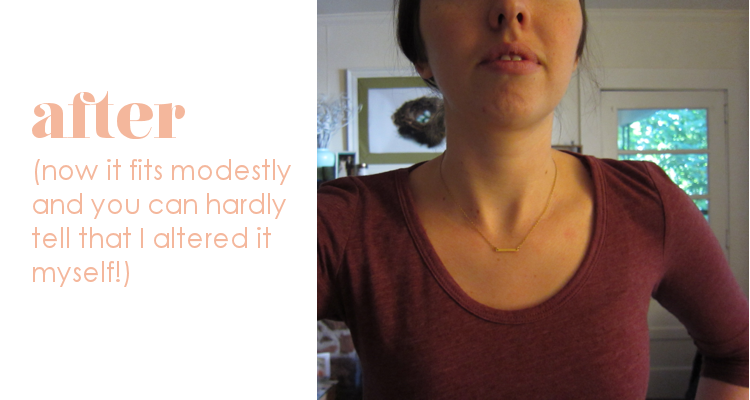
7. Now, try it on again and admire the handiwork of your new top that now fits you more appropriately! Here’s how mine looks now:


And really, the only place where the alteration is noticeable is at the shoulder seam where there’s a slight tuck, which you can see here:


But that’s not really a big deal to me and is worth it to have a top that I don’t have to layer over tank tops just to be able to wear out in public!

P.S. If you like this tutorial, please click here to pin it to Pinterest! You can also follow me on Pinterest here. 
Related Posts
I've got a sewing itch that needs scratching...
Shopping My Closet for Crafts
READ FULL POST >>

A Call to Get Crafty in Your Closet: Make the Most of Your Wardrobe, A New Series at Life Blessons


I’ve been cutting and stitching clothes for more than a decade, a hobby that started in high school when you couldn’t find those worn-in, vintage-looking t-shirts anywhere but in an actual vintage re-sale shop. With a thin, teenaged frame, the men’s tees didn’t fit me well, so I decided to take matters into my own hands.

Armed with a $2 t-shirt and nothing to lose, I decided to take a sewing machine (still newfangled to me back then) to give the top my own alteration, taking it on the sides and shortening the sleeves. I remember trying it on the mirror and thinking, Well, I think it looks good... And then, holding my breath, taking a pair of shears to lop off the extra fabric on either side of the new hem. Once you make that first cut, there’s no going back.

But you know what? I still have that t-shirt. It’s actually the top I was wearing when I first met my husband: A heathered gray t-shirt of the softest, worn-in-just-right cotton you’ll find, with “Ole Miss” printed on the front. I remember it so vividly because it’s the first time I really allowed myself to get creative with my crafting and take the risk that if I mess up, the entire shirt can be ruined.

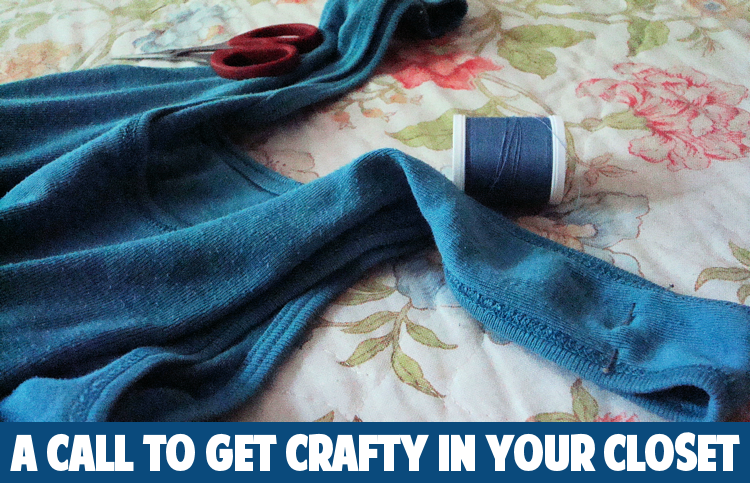
Today, that one intrepid move has multiplied throughout much of my wardrobe, with many pieces hiding nips and tucks that I’ve sewn by hand or with my sewing machine. I’ll be in the fitting room, trying on a tank top from the clearance rack and think, It’s a little too low-cut. But what if I pulled up the straps a bit? Tug them up, and it’s clear that with a few simple stitches—like you can see in-process in the image above—the shirt can be transformed into something more modest and wearable. Or when I’m thumbing through my closet and come across a skirt that hits me at the wrong spot because it’s a wee bit too long, I begin entertaining ideas of playing with hem length.

And time after time, I’ve learned is that it’s OK to take these risks, especially on clothes you’ve bought for next to nothing (whether second-hand or from the sale rack) or don’t wear anyway.

This is one of my favorite things to do, which is why I'm so excited to kick off my next series here at Life Blessons: "Make the Most of Your Wardrobe."

Through this series, I'll share a bunch of tutorials for ways I've reinvented items in my closet to make them more wearable, from adjustments that are merely decorative to ones that are extremely functional.

In celebration of that, I thought I’d take today to share just a couple of examples (although, notably, sans any "before" pictures, unfortunately) that will hopefully inspire you to thread a needle and give it a go yourself. And I'll be back next week to kick the series off with my first tutorial.

Until then, here are some ideas to get you started:


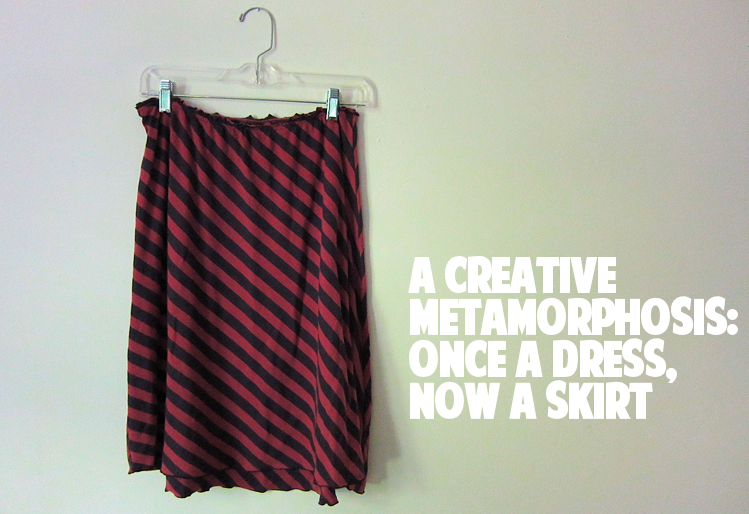
Originally, this was an empire-waisted dress that I picked up at some sidewalk sale. I love the colors and the soft jersey, perfect for summer. But it had a really low-cut neckline that I felt uncomfortable wearing unless it was under a buttoned-up cardigan. Not very practical for a Southern summer, so one morning while getting ready for church, I eyed the dress and wondered whether I could turn it into a skirt.


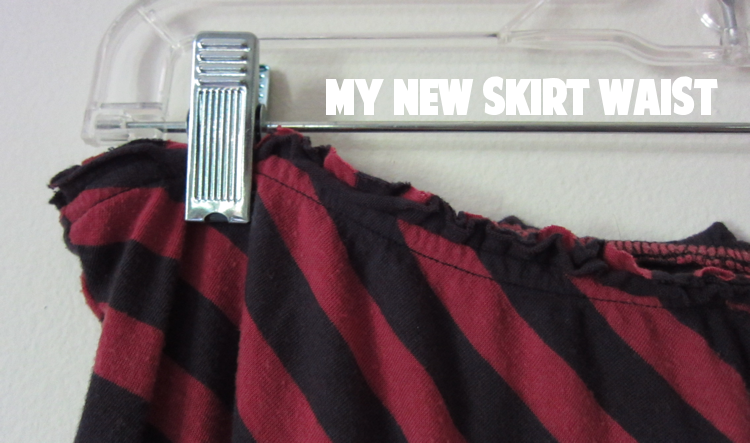
Moments later, I’d pulled the elastic empire waist down to my hips and sure enough, it fit. I took some scissors to it and snipped away the bust, giving way to a perfect-length skirt. Plus, since the fabric’s jersey, there was no need to hem it at all!


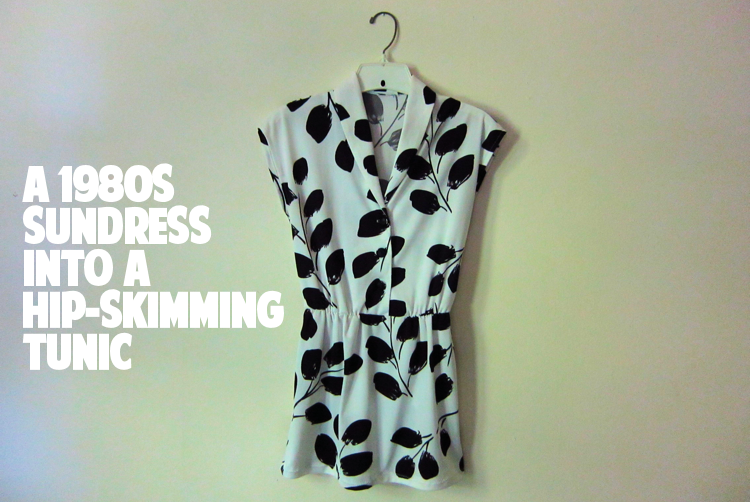
This is one of my favorite wardrobe crafts, that I completed a couple of years ago. It was also a dress, one from the 80s or 90s that I got from a thrift store. When I got it home, I realized that the skirt portion was too tight and completely unflattering. What’s a girl to do?


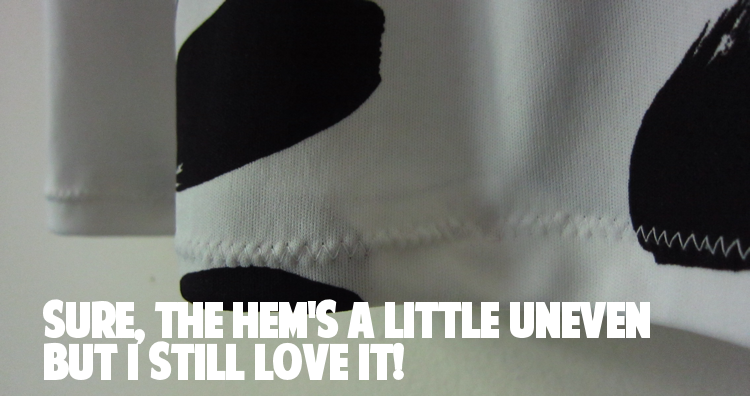
Chop off the bottom, and turn it into a shirt! I tried a zigzag hem, which got a little wavy at points, but that’s part of the beauty of these projects: The imperfections remind me that I was the one who made it and evidence that it was a labor of love!

What are your thoughts on crafting your closet? Any memorable wardrobe re-dos that you can share? I’d love to hear your experiences in the comments!

Related Posts
Living with Less: Why I Got Rid of Half My Clothes 
Shopping My Closet for Crafts
I've Got a Sewing Itch that Needs Scratching... 
READ FULL POST >>
Next Post Previous Post
Related Posts Plugin for WordPress, Blogger...