My True Story of Being Healed by Prayer (Part 2)


Yesterday, I shared the first part of my story about how God has healed me of my psoriasis through prayer. (Click here to read Part 1 of my story of healing.

Here's what happened next...

For three years, I was healed of the pain, the itching, the lost hair.

But then, a couple of months ago, I started noticing the itching returning, the hairs gathering on the shower drain. I prayed and prayed for myself, but to no avail. So then I told my husband about it and asked him to pray for me. He did, and it stopped once again.

I told him the good news but then, a few days later, it started again. I had the feeling that this was a story that God did not want to go silent. I had the feeling that this was a means for me to be bold in asking for prayer—and a testimony to others.

So I went to my community group at church and asked them to pray, telling them about the two previous bouts of being healed.

They prayed for me. And then, like both times before, by the following day, all was well and I could again claim being healed.

It was enough to make me wonder, “Why?”

Why can I pray for myself to no avail, but the moment I let go of my pride, open myself to vulnerability and ask others to join me in prayer, does that prayer get answered? Why does it get answered so immediately, when others’ prayers don’t?

I don’t have all those answers. But I do know that I feel like in my instance, it’s an opportunity that God has used and wants to use to proclaim his name over everything, over people like me, over situations like mine, over the complete ordinary events in life—even a scalp that itches.

I feel like it’s an opportunity for me to continue to let go of my pride and open myself to vulnerability to tell others what God hath done for me, and that though it might look very different in your own life, it’s what he wants to do for you, too. It may not be a physical healing, but maybe emotional or relational. Maybe it’s neither of those, either. But what it most certainly is, is a spiritual healing that transforms hearts and minds and souls to a goodness and a peace never otherwise understood.

Jesus spent so much of his ministry healing brokenness, particularly of the physical variety. In one notable instance, he heals ten lepers. Yet, only one of the healed men (who also happened to be a Samaritan) returns to thank Jesus. “'Didn’t I heal ten men?'” Jesus asks. “'Where are the other nine? Does only this foreigner return to give glory to God?' And Jesus said to the man, 'Stand up and go. Your faith has made you well.'” (Luke 17:17-19)

I may not know why it all happened, but I know that it did. And I know that I do not want to be like one of the nine who took the healing without giving glory to the One who healed them.

No, I will give glory to my God who healed me: Praise God, I’m healed!

Related Posts
Amy's Testimony: Beyond the Physical Healing
The encouraging testimonies of answered prayers
READ FULL POST >>

My True Story of Being Healed by Prayer (Part 1)


I have a soft spot in my heart for stories about people who have been healed, not by medicine but by God himself. That’s because I believe in those stories, having known people who have been miraculously healed, having prayed for it with my own lips, having experienced it myself, firsthand.

I know many people scoff at the idea of miracles these days, especially miracles that happen to one person, when another person lies ill and their prayers go unfulfilled. Truth be told, I don’t consider myself “worthy” of having been healed because my situation pales in comparison to those others out there who are facing life-and-death illnesses. But it is for that very reason that mine is not only a story of being healed but also a story of grace and mercy. Isn’t that—to display grace and mercy—what the Bible, what Jesus’ ministry, was all about in the first place? I’m here to tell you that truth is alive and well today.

This is a post I’ve been meaning to write ever since I first started this blog, but a post that I never quite seemed to have the words for, until now…

I remember noticing it my sophomore year in college, when my scalp started itching a lot. I found myself literally scratching my head over the matter, always reaching
up to the nape of my neck to scratch at the lingering itch. This went on for days, for months, for years.

At some point, I realized that it wasn’t really normal, this incessant itching. It was causing my hair to noticeably fall out, not a good fashion statement for someone already saddled with fine, thin hair. I read magazine articles about how to make your hair thicker and healthier, so I bought some vitamins. I tried different shampoos, even medicated ones to keep my hair from falling out. Nothing really helped.

I finally went to the doctor and then the dermatologist who diagnosed me with psoriasis, a disease that affects the skin (in my case, my scalp). Put more scientifically, it’s “an immune-mediated disease that appears on the skin … when the immune system sends out fault signals that speed up the growth cycle of skin cells.” (You can read more here, if you’re interested.)

The dermatologist prescribed me with some ointments I could use that would alleviate the itching but not cure the condition. My hair was still falling out, and I still had to fight the urge to scratch the itch that was always burning at the back of my head.

It was around this time that I started going to a prayer group that met at my church. It was a place where people believed that prayer worked and the fruits of that faith were seen week after week. (You can read more about my experience attending that prayer group here, or about some of the answered prayers that happened there, here.)

One week, we got together and instead of breaking into individual prayer groups, we all wrote our prayer requests down on a scrap of paper and dropped them into a cardboard box. Everyone gathered around the box, prayed over it, and then the scraps were destroyed without ever having been read by another pair of eyes. On my scrap of paper, I wrote that I wanted my psoriasis healed, I wanted my hair to stop falling out.

The next day, I took a shower and as I washed my hair, I looked down at my hands and didn’t see the usual clump of hair laced around my fingertips. Honestly, I was shocked to think that the prayer had worked so quickly. So I waited another week, just to be sure my eyes weren’t deceiving me.

They weren’t.

To be continued... Tomorrow I'll share Part 2 of my story about how God has healed me of my psoriasis through the courage of a single prayer.  

"Confess your sins and pray for one another, and you will be healed. 
The prayer of a righteous man is powerful and effective."  
(James 5:16)

Related Posts
Amy's Testimony: Beyond the Physical Healing
The encouraging testimonies of answered prayers
READ FULL POST >>

A Few of My Favorite Things: Bible Study Resources Edition

These are A Few of My Favorite Things, an on-going, once-a-month (or so) series that sheds some light on, well, my favorite items throughout my home. (To read through all posts in the series, click here.)

In this Bible Study Resources Edition, I'll be looking at five of the resources that I find most essential to nurturing a deep quiet time with the Lord and his Word each day.


1. Life Application Study Bible (New Living Translation): This is the study Bible I currently use in my daily Bible reading. I have been using it consistently for almost a decade and have come to love how it provides a great mix of insights from how to apply what I'm reading to my own faith to gaining a better understanding of the historical and cultural contexts of what's in the text. You can read a more in-depth review of this study Bible that I wrote about here.

2. Devotion Journal: I've found that it's much more fruitful for me to take notes while I'm reading through the Bible or praying, so I recently created a devotion journal where I can write out my thoughts, prayers and notes all in one place. There are sections devoted to a variety of categories, which helps me be able to go back and see what I learned about a certain section I was studying or read through prayers and see how God has answered them. I wrote more about creating my devotion journal (along with instructions for making your own) here.

3. Seminary Lectures and Podcasts from iTunes U: Thanks to iTunes U, you can download lectures from a variety of seminaries around the country and listen to them for free. I've found this really helpful, as I've been wanting to dig deeper into certain bits of Scripture and hear insights from other scholars. Some favorites that my husband and I like to listen to come from Reformed Theological Seminary, Fuller Seminary, Dallas Theological Seminary and Covenant Theological Seminary, all of which have selected lectures available on iTunes U.

4. YouVersion: YouVersion is a free app you can download onto your computer or mobile device (I have it on my iPod) that includes hundreds of Bible translations in all different languages. I've found it helpful to have on hand when I'm reading a verse and am not quite sure what it means; I'll pull the verse up in this app and scroll through the different translations of it so that I get a better understanding of what the verse means. It's also handy to have with you on the go to be able to look things up. You can bookmark verses, use their Bible reading plans and more via the app.

5. Bible Study Workbooks: I've done a lot of Bible studies in my day, but there are a couple that I keep coming back to because they were so enriching for me: Beth Moore's Stepping Up: A Journey Through the Psalms of Ascent and Priscilla Shirer's Discerning the Voice of God. Whereas I feel like a lot of packaged Bible studies can be overly simplistic and empty, both of these were eye-opening for me and taught me so much about the Lord and my relationship with him. They both include lots of space for taking notes and engaging with the text as you go, as well as delivering deep insights and personal stories that brought the texts alive for me like never before. I've written more about the Stepping Up Bible study here and a little about Discerning the Voice of God here.

What are some of your favorite Bible study tools and resources? Anything you think I should check out? Let me know in the comments!


Related Posts
Psalms Bible Study Review 
Making the Psalms Your Own
10 books I want to read 
READ FULL POST >>

What I've Been Doing with Our Extra Books: Selling Them on Amazon


One of the first things I remember admiring about my husband, back when we first met, was his love for reading. I remember listening to him share what he had learned in this book or read about here and it felt, only two days after our first date, like a kindred spirit already.

When we got married, this love for reading became evident in our collection of books that easily filled our bookshelves—taller than we were—and spilled their way into the other shelves throughout our apartment. But it really hit home when we were making our grand Grand Rapids-to-Atlanta move and had to haul all those books that 800-mile stretch of highway and up two flights of stairs.

With my muscles pleading for mercy, I knew we needed to whittle those suckers down. Not only did we have duplicates of some of the same books (see, I told you we were kindred spirits!), but we had collected many books that we would honestly never read or reference again.

So, I decided to look into selling them online, something a few other bloggers I follow seem to have had luck with. I was a little weary of this at first; I've only ever bought a couple things off eBay to begin with. But I figured it was worth a try, so I crossed my fingers and threw some books up for sale on Amazon, using their "used" section.

Within days, books started to sell; five in the first week, two more the week after. In the first month, we made about $75 profit selling books, dvds and cds. (Want to see what is currently up for grabs from our Amazon shop? Check them out here.)

Especially exciting was one book I'd picked up a few years ago at a dollar store with intentions of giving away as a gag gift. It was this retro-looking book called "How to Be a Man" with tongue-in-cheek advice about being macho and masculine. Anyway, when I looked it up, other sellers were hawking it for upwards of $60! Since I'd only paid $1 for it, I put it up for $24, unsure if anyone would even pay that much for it. What do you know, but someone did snatch it up, stretching that dollar investment much further than I'd ever expected!

I've been selling our extra books on Amazon for more than a year now and have used it as a nice little way to add some cash to our savings accounts, although sometimes it's only $5 or $10 a month, depending on how many books we manage to sell. You can read more about how to sell your books and other media through Amazon here.

If you're interested in trying to sell books on Amazon, here are some tips:

Know that they do take a commission off the sale. I've found it's usually between $3 and $6 off every book. So even though you put in a sale price of $5.99, after they take their commission and you pay to ship the book (I also make sure to include delivery confirmation on every package), you're only left with about $3.50. To me, if it's a book I didn't want or need anyway, that's still a better price than I would get if I took the book to a resale shop or tried to sell it at a garage sale.

You aren’t going to be able to sell every book. This is especially true with bestsellers or classics because tons of people are already selling them for pennies, which you can’t compete with at all or you'll lose money.

You have to package and ship the books yourself. That can be a bit of a hassle, and you'll have to provide your own shipping supplies.

An alternative way to make some extra money. If you don't need the money immediately and are willing to wait for your books to sell, it can be a potentially profitable way to get rid of media that’s just eating up space on your shelves and make more money than you would taking your stuff to any resale shop.

(Get more details about how to sell your books and other media with Amazon here.)

Have you ever sold anything on eBay, Amazon or Etsy to make some extra cash? What's been your experience? Share your thoughts in the comments!

Related Posts
3 Easy Ways We've Learned to Stretch Our Finances
Being Intentional About Saving Money
READ FULL POST >>

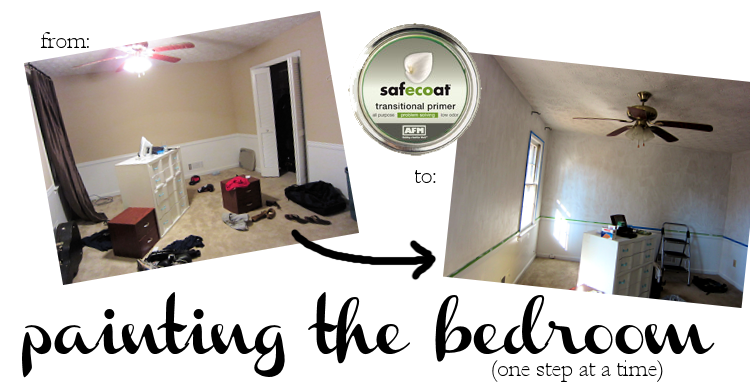
We Started Painting Our Bedroom… (Or, How We Celebrated New Years' Eve)


We are not the most ambitious of homeowners, my husband and I.

Exhibit A: The fact that we picked out the paint color for our bedroom the week before we signed the contract on the house. But when it came down to actually painting it, well, we kept pushing it off, even though we had set up our boudoir in the house’s smallest room, what will eventually be the guest bedroom.

You’d think the fact that we were living in a room that was nothing more than a bed and a lamp without a lampshade (the life of luxury, friends!), that we’d be motivated to get the paint up pronto.

It finally wasn’t until New Year’s Eve that we bit the bullet, holed ourselves up in the room and started painting.

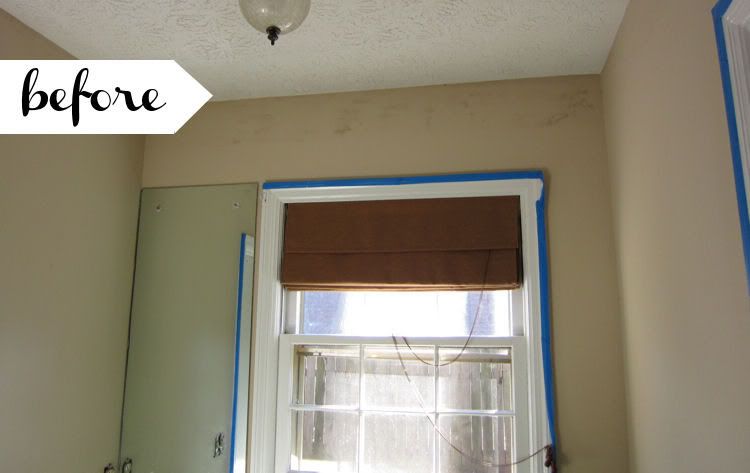
Here are some before pictures to refresh your memory:


(You can see more "before" pictures of our new house here.)

With the goal of using paints that are both safe for the environment and for our health, we turned to a brand that you might not be familiar with but that has gained a reputation for being a premium product without use of any toxic or malodorous chemicals: Safecoat.


You might have to search to find their products (for instance, there’s only one store in Georgia that sells their paint), but it’s worth it when you consider their good-for-you health claims:

Because their naturally low-odor paint blocks toxic emissions from seeping into the environment and does not include formaldehyde, ammonia, acetone or a list of other carcinogenic/hazardous materials (which other low-VOC paint brands may count among their ingredients), their products are specifically recommended for those who are chemically sensitive (my husband falls squarely into that category) and is a doctor-recommended paint. In fact, many hospitals and schools use Safecoat paints because of this. According to their website, they claim that it’s the least toxic product of its type.

They sent us a gallon of their transitional primer, which serves as a good stain blocker for covering up a myriad of eyesores, whether knot holes, oils or stains that can bleed through to the surface with traditional waterbased paints.

With 2011 ticking away, we took the first step of painting our bedroom and started priming. While there was a slight but noticeable smell, it was not overpowering and didn’t bother my husband, who is extra sensitive to chemicals and smells.

The paint went on easily and because it’s waterbased, was easy to clean up if we accidentally dripped or went over the painter’s tape. That is one of my favorite things about the prevalence of waterbased paint—it’s so forgiving!

We worked at painting for the next few hours, and we still had half a can of the primer leftover, which goes to show the paint provides great coverage.

Here's how well it covered up the walls:


So, then, with the primer drying on the walls, we celebrated the New Year like the homeowners we officially are: We went to bed around 9pm, whooped from our DIY workout!

And now? Weeks later, it still looks the same. That’s where our ambition has faltered. Hopefully, not for much longer, though. I’m hoping it’s something we can throw on the to-do list this weekend. And finally start sleeping in our real bedroom. Talk about sweet dreams!

If you’re interested in learning more about Safecoat’s line of paints—which includes the transitional primer that we used but also a variety of interior and exterior paints, stains, sealers and more—you can visit their website or check out their map to locate the closest dealer near you.

Related Posts
The Process of Turning a House into a Home
Dishes and Papers Pile Up, and I'm Okay With That...
READ FULL POST >>

The Importance of Having a Devotion Journal (And How I Created My Own)


Over the past couple of weeks, I've been sharing some resources and inspiration to encourage some of you to make daily time spent with the Lord and his word a priority.

First, I talked about why I think making time for the Lord is the most important resolution we can make. I shared about my goals for the year regarding my Bible reading plan and my fondness for the reading plan that I used last year.

Then I shared reviews of the study Bibles that get the most use in my house, and some tips for choosing a study Bible of your own.

Now we're rounding the bend...

Because once you have a plan for reading your Bible in place and whatever Bible you want to use, the next most important item in my experience for getting the most out of my daily time with the Lord is having a devotion journal.

That's the place where I can take notes on what I'm reading, record prayer requests and answers, journal out my day and keep track of anything else that comes to mind while I'm sitting at the Lord's feet.

While I've used the same Bible study for almost a decade, that has not been the case with the devotion journal I've used, as it's taken on a myriad of incarnations. (I wrote more about a bunch of my past attempts here.)


But I think I've finally found one that really works for me. One that takes the best of all the worlds of all the different kinds of tried—from notebooks to binders—and melds them into one.

It's a devotion journal that I made myself, and no doubt that it shows that it's obviously handmade.

But I love the versatility of it, that I can switch pages around and group them together as I wish, like a binder. But I can also lay it flat and write on the backs of pages smoothly like a spiralbound notebook.

Those little things probably sound ridiculously picky. But they were significant enough that they would affect how much I'd make use of it. And since I want to really know the Scriptures, I've decided that if I’m going to be picky about something, I want it to be about something as important as this.

Which is why I got the inspiration to blend the best of both worlds and build my own devotion journal, which you can add pages to, divide up easy as pie, and scribble flatly on both sides of the paper. Oh, joy.


Here’s how I created my own.

You’ll need:
  • 2 pieces of sturdy cardboard or plastic to use for the cover (consider repurposing cereal cut to size)
  • Hole punch
  • 3 binding rings (find in an office-supply store, near the paperclips or online here)
  • Filler paper, with 3-holes punched along the side
  • Dividers or tabs
Get started:
1. Cut cardboard roughly larger than an 8.5x11 piece of paper. The cardboard pieces will serve as the front and back cover for the journal, so if you want to decorate them, you should probably do that first. Once you’re ready, punch 3 holes along the left side of both pieces, using a piece of the filler paper as your guide to space the holes apart.

2. Open one binding ring and thread the back cover onto it so that the inside of the cover is facing up. Then thread a handful of paper on top of that. Finally, add the top cover, and close the binding ring. Repeat with the two other rings, threading them through one hole at a time. This is the most basic form of the journal.


3. If you want to divide the journal into sections (such as into prayers, reflective journaling, what you’re reading in the Bible, sermon notes, etc.), determine roughly how many pages you want to allot to each section and slide a divider in. (If you want some ideas for the different sections to include, you can read my previous post about when I created my prayer binder. I am using the same kind of section system here.)

When you finish a section or the paper gets too bulky, you can easily transfer the older sheets into a permanent binder if you want to hold on to them for future reference.

4. You’re done! Now go on and journal to your heart’s content, with a handcrafted journal that combines the best of both worlds.

P.S. If you like this tutorial, click here to pin it to Pinterest. You can also follow me on Pinterest here.

Related Posts
Embracing What My Prayer Time Looks Like in Different Seasons
How a 3-ring binder has changed the way I pray
READ FULL POST >>

The Faith to Trust Where God Has Placed Us: A Lesson from the Bible


There are a few stories in the Bible that make me a little uncomfortable. I hurry through them and like to forget them in favor of the ones that are filled with the beautiful, flower-laden imagery of love and rescue and restoration.

Not a tent peg brutally hammered into a man’s head while he slept.

And yet, that was the story I was asked to teach on awhile ago for the women’s Sunday School class at our church: Blood, murder and a metal spike to the skull. (Not your typical Sunday School lesson, right?)

It’s the story of two women, Deborah and Jael, found in the book of Judges in the Old Testament. And since I had to teach on it, I couldn’t just breeze through it like I have in the past. I had to look closely at this story, this story that, though I might not like the blood and the gore of it, is nonetheless recorded for us in the Bible.

As I cracked open my Bible and read through their story, I discovered (murder aside) it an inspiring one for us women, where victory for a nation starts with the actions, the faith of these two women.

In a nutshell, the story is that Israel has been oppressed for 20 years before they repent and start praying to God for freedom. God has appointed Deborah to be judge over the people, and one day, she sends for the leader of the Israel army and tells him that God is ready to give them victory against their enemy. He tells her that he’ll only go if she accompanies him. She agrees, but because of this—that he trusts the strength of man more than the promise of God—she tells him that the victory will come at the hands of a woman.

Cut to the battle, where God confuses the enemy and the Israelite army begins to slaughter them. The leader of the enemy army, Sisera, escapes and goes to the tent of Jael, whereby she agrees to hide him. Sisera soon falls asleep and she sees her chance: In those days, it was the woman’s job to pitch and maintain the tent. So she picks up her much-used tent peg and mallet and hammers the spike into his temple, killing him and providing the answer to an entire nation’s prayers.

As I read the story, I noticed how these two women used the positions God had given them—that as a judge, that as a woman who lived in and worked with tents—to bring salvation to his people. They were not warriors but yet God used their talents, skills and roles to bring about victory, much in the same way that David was able to take down Goliath using his well-worn slingshot instead of a heavy sword.

Compare that with the Israel army’s leader who would only go to war if Deborah went alongside him. He was presumably one of the best fighters in the land, but because he didn’t trust God’s promise, that position and strength was not enough.

Through their actions, these women lived out a strong, unwavering faith that God could do the impossible, even with their feeble, ordinary offerings. Surprising things can happen when we have the faith to trust where God has placed us…

Related Posts
Making the Psalms Your Own
A Handy Resource for Discerning God's Will for Your Life
READ FULL POST >>

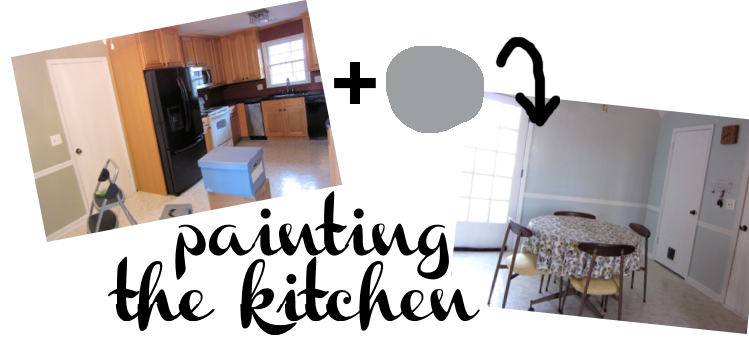
Sprucing Up the Kitchen With a Fresh Coat of Paint


Once we had signed the papers and officially owned our house, one of the first things we wanted to do was get some paint up on the walls, starting with our kitchen which was festooned with a couple green walls and a couple red ones. On their own, neither color was bad, but neither was the color I would have picked for the room where I expect to spend a huge chunk of each day.

Want proof? Here are some "before" pictures to refresh your memory:


(You can see more "before" pictures from when we first purchased the house here.)

For the first time since living at home with my parents, I was able to pick the color that would adorn the walls, to pick a color that reflected my tastes and personality. After so many years living in apartments with white and cream and beige and khaki walls, that freedom seemed like such a luxury!

When we had first started entertaining putting an offer in on the house, I’d had a vision of seeing those Christmas-colored walls turn to a pale blue hue. So, to the paint store I went, collecting fistfuls of swatches and comparing every variance and shade and back again.

I was looking for something specific: Not too blue, so as to look like a nursery. Not too bright so as to seem garish but not too light so as to seem lifeless.

The answer was “Woodlawn Sterling Blue,” a blue-gray hue from Valspar’s line of paints, which you can find at Lowes. With hopes of selecting a shade that I’d enjoy decorating with for years, I liked that this color was part of an exclusive palette that Valspar has created in conjunction with the National Trust for Historic Preservation. The 200-some colors that make up this palette are the same colors that have been documented in historic homes and architectural sites all across the country; for instance, the color I chose originates from the Woodlawn house overlooking the Potomac that George Washington purchased for his nephew. Quite the testament to the fact that these colors have already stood the test of time!


That was the kind of longevity I was looking for in my color choice, but I also needed something that would be practical for me in the everyday. Which is why we went with Valspar’s new Valspar+ line (also available at Lowes), which not only dries to an antimicrobial finish that makes it resistant to mold and mildew (perfect for our kitchen setting) but its zero-VOC formula is also certified asthma and allergy friendly. My husband is incredibly sensitive to smells and chemicals, so it was imperative that our paint choice be one he could live—and breathe—with.


Armed with a couple gallons of our paint, courtesy of Valspar, we went to work, transforming our kitchen.

It was only after we’d been painting for an hour or so that I realized there was not even the slightest paint smell at all. My husband did a lot of the painting himself and didn’t suffer from a single headache, which he can get even from spending the night in a hotel room where they use chemical-laden cleaning supplies. So I was pleased that the paint lived up to its breathing-friendly claims!


Within a couple hours, the paint dried to a shade that was a complex combination of blue and gray that shifted slightly with the changing light. My husband and I both agreed that the azure also really helped lighten up the wall of blonde cabinets that had previously felt a little dark and cavernous against the dark red.

Here's what it looks like now:


Plus, because the paint is water-based, it was a cinch to clean up, which we took care of right in our kitchen sink! Just use a little soap and water, and the paint washes away from brushes and bristles and bare hands. That also made it really forgiving around our granite countertops, so I was able to easily scrape away any excess paint. (Once the paint has had time to fully cure, though, it is durable and you can wipe it down without a worry.)

While there still are more decorating details I expect to attend to in the room, updating the backdrop for them with my new true-blue color has made a world of difference, turning it from a culinary cave into something of a soothing oasis. Ahh....

Find out more about all of Valspar's paints, as well as information about Valspar+, which you can find at Lowes. They also offer plenty of tips and how-to videos on painting, picking out colors and more on their website. For more, follow them on Twitter or like them on Facebook.

Related Posts
We're On the Move…
My Latest Endeavor: Watercolor Painting 
Make Your Own Fancy Chalkboard with a Picture Frame
READ FULL POST >>

The Importance of Guarding My Daily Devotionals: A Lesson Learned


One of my good friends recently got engaged and is planning a short engagement. It took me back to my own days of being engaged and counting down mere weeks from the proposal to “I do.” From the night my husband asked for my hand during a rain storm until the wedding ceremony (which also featured a freak storm that brought our outdoor nuptials inside) was 10 weeks exactly.

As any of you who have planned a wedding know, that’s pretty fast.

But despite the short time frame, the wedding came out just as lovely as I could have wanted. 

The thing is—as I recalled to my friend with a bit of firsthand, here’s-to-hindsight experience—I made the mistake of putting wedding planning first during those weeks while letting other priorities get pushed to the backburner. Priorities like God.

Whether you’re getting married in a few weeks or a few months, whether you’re working in a high-stress job, whether you’re caring for a cranky child or any other number of life experiences, we all can easily justify this mistake. 

It was so easy for me to look at everything before me that needed to be done and to just dive right in, dealing with my circumstances first rather than nurturing my soul. It was so easy for me to tackle the demanding first while letting the life-giving sit idle.

After only a few weeks of this, I found myself in a place where I hardly recognized myself anymore. I found myself in a place of faith crisis. I even called up my then-fiance and told him, “I don’t know if I believe in God anymore.”

I had never stopped loving God during that time period. I hadn’t even stopped going to church or Bible studies. I had simply stopped connecting with Him. I’d severed those ties that had bound us so closely together just a month earlier and saw how quickly it had all unwound. I saw how doing so left me feeling empty and detached from the Lord so that I questioned his very existence.

What a revelation. 

It spurred me to dig back into my faith, to pick back up my trusty Bible and pour my heart into it. To get back on my knees and pour my heart into my prayers. To reclaim the priorities that mattered most. A wedding will come and go, but faith lasts through eternity.

It’s for that reason that my daily quiet times are now a non-negotiable priority, why I contend that making time to spend one-on-one with God is the only resolution that really matters. I have been in that place where I saw the result of their absence. And I have seen how that daily investment—a daily piece of Sabbath in the mundane and the chaotic—can bring life back to a deadened heart.

“I am the true grapevine, and my Father is the gardener.
He cuts off every branch of mine that doesn’t produce fruit,
and he prunes the branches that do bear fruit so they will produce even more.
You have already been pruned and purified by the message I have given you.
Remain in me, and I will remain in you.
For a branch cannot produce fruit if it is severed from the vine,
and you cannot be fruitful unless you remain in me
.”
John 15:1-4

Related Posts
Remembering Our Wedding Vows 
How My Husband and I Met Two Years Ago Today
READ FULL POST >>

Make Your Own Whole Wheat Hamburger Buns


If you know me well, you know that one of my favorite meals is the sandwich. There’s something about stuffing your meat and veggies between two pieces of well-made bread and adding some zippy condiments that takes the combination to a new level.

And a good hamburger bun—whether it’s for putting together a burger or dressing up a sandwich—is an essential part of that equation. That’s why I make homemade hamburger buns; you just can’t beat fresh-baked breads. Plus, you can store these in a freezer bag and freeze them until you’re ready to use them. They still taste great!


This whole wheat hamburger bun is another that takes advantage of my already-established favorite kitchen: my bread maker. I use it to mix together the dough, and once that cycle’s completed, I can come back and shape the dough into the buns to bake in the oven. (If you’re looking for some other recipes to take advantage of using a bread maker, some of my favorites include making whole wheat sandwich bread, pizza dough, soft pretzels, and bagels.)


1 cup warm-ish water
1 egg
¾ tsp. salt
¼ cup butter, melted
¼ cup sugar
2 cups unbleached all-purpose flour
1 cup whole wheat flour
3 tsp. bread machine yeast


In your bread machine (mine is similar to this one), add ingredients from the water to the flours, in the order given in the recipe. (So, you'll add the water first and the whole wheat flour last.)

Once you've added the last of the flour, use a spoon to hollow out a little dent in the middle of the flour. Into this, add your yeast. Program your bread machine on the "Dough" cycle. Press Start.

Let the bread machine mix the dough and go through the rising cycle. At the end, it will beep. Remove the ball of dough from the bread machine's pan, and turn dough out onto a lightly floured countertop. Using a dough scraper (or a sharp knife), divide dough into 12 equal pieces. (Make this easy by rolling dough into a rope, and then divide it into four equal sections. Then cut each of those sections into three equal pieces.)

Form each piece into a ball. Place on a lightly greased baking stone (here's the baking stone I use) or cookie sheet, leaving about two inches of space between buns. Cover dough with a cotton dish towel or cloth napkin, and set in a warm place to rise for about 45 minutes. (For an easy way to let your bread rise, read my breadmaking tips and tricks article.)

Turn your oven on to bake at 400-degrees. Remove the dish towel from the dough, and let it bake in the oven for about 12 to 15 minutes, until golden. Remove from oven and let cool.

Once cool, split buns in half horizontally. Store slices in a sealed bag or airtight container for up to a week, preferably in the fridge or freezer if you aren’t planning on using them right away. Makes 12 hamburger buns.

If you like this recipe, click here to pin it to Pinterest. You can also follow me on Pinterest here.

(Plus, take a peek at my breadmaking tips and trick article, which will provide some good insights about how to overcome common problems, easy substitutions you can make if you run out of some ingredients, and some of my favorite breadmaking essentials. Read the article here.

P.S. If you are new to this blog, thank you so much for stopping by! You can feel free to browse all my other posts about my journey toward a lifestyle of simplicity and DIY, as well as some of the ways my husband and I are learning to save money. I also write about my faith, my marriage and everything in between, which you can explore in the archives.

Related Posts
A Love-Hate Relationship with my Bread Maker
Homemade Black Bean Burgers Recipe
Chicken burgers: Recipe for the weekend 

READ FULL POST >>

Selecting a Study Bible, Plus Reviews of the Versions My Husband and I Use


I’ve found that one of the key elements when it comes to reading through and understanding the Bible has been to have a good study Bible that is filled with helpful footnotes, explanations and cross-references. Even though study Bibles are usually a lot more clunky than an already hefty Bible, for at-home reading, I have found that it’s been to my advantage to have a solid source at hand.

I have been using the same study Bible for almost a decade and wanted to share a little more information about the one I use, in case you are in the market for buying a new one. I also had my husband share some about the study Bible he uses, in case that might be a better fit for you.

Because the truth is that what study Bible works for me, may not work for you. The translation that I love to use may not be right for you, right now. And that’s okay. The important thing is trying to find out which version helps you understand the Bible better, spend more time reading it, growing in your walk. We can get hung up on other details and nuances, but we must not forget that actually reading the Bible, whichever kind you choose, is the most important thing!

So, without further ado, here are the two study Bibles that get the most use in our house, with our personal opinions and reviews included:

Life Application Study Bible (New Living Translation): This is the study Bible I currently use in my daily Bible reading. I bought it when I was a new Christian, and I think it’s well-suited for newbies and more mature Christians alike.

You’ll find that it takes any given reading and provides practical insights that help you apply the concepts in that reading to your everyday life. I think this is what makes it a strong choice for new Christians, because it asks questions to help you think about how you live out God’s Word on a daily basis.

But for older Christians, it also includes a lot of historical explanation, commentary, maps and charts that help you get a firmer understanding of what’s going on in the passage or how it’s linked to other passages. There are times when I do have a question that they don’t address, but I think it provides a hearty starting point for digging deeper into Scriptures no matter where you are in your walk.

As far as the NLT translation, I really like it as I feel that it presents the writings in a way that I can easily understand and uses down-to-earth language that makes tripping over the words or meaning, which more literal translations might be prone to, less likely. (Although if I do, usually the footnotes provide clarity or, if all else fails, I’ll look up alternative translations of the passage using the YouVerse app on my iPod.)

Harper Collins’ Study Bible (New Revised Standard Version): This is the study Bible my husband uses the most. Here’s what he has to say about it:

“If you are looking for a good Study Bible, I recommend this one. For starters, most seminaries and universities recommend the NRSV translation of the Bible for studying the scriptures. From Yale University to Fuller Seminary, the NRSV is a trusted present-day English translation of God’s word.

Now, not all of us are biblical scholars, and so to help enrich our study of scripture, we need help in understanding the history, culture, language, so forth of the Bible. As it relates to this Study Bible, I find the sections before each book of the Bible, which provide background info, to be helpful in understanding a little bit of historical context. Not only that, but I also find that maps and charts, conveniently located at the back of the book, to be useful. And finally, the concordance, in the way back of the book, is an important component to any Bible.”

Additional Tips for Choosing a Study Bible
When I told my husband—the man who always has his nose in a book and is investigating all sorts of Biblical questions I never would have even thought to ask—I wanted to share these recommendations, he wanted to lend an important caveat to anyone looking to purchase a study Bible:

“Now, let’s be honest. Sometimes it is too easy to trust what someone else says about Scripture. In our own study of the Bible we can easily default to what the commentary below the passage we are reading says, believing that the ‘expert’ who wrote the commentary knows it all. So I caution you when adding a study bible to your library: Don’t come to rely upon everything the commentator writes, trusting in his or her meaning of the text.”

My husband also recommends that “in your own study, remember that "Context is king." Meaning it is useful to read large portions of scripture at a time, because it can help one to understand more of what is going on in the text.”

(That is one of the many reasons I found my chronological reading plan especially useful as it helped me read large chunks at a time and really understand the overarching themes and patterns that are difficult to discern when reading a handful of verses at a time.)

Are there other study Bibles you like to use or recommend? Please share your thoughts in the comments so readers can get more recommendations for other versions to consider!

Related Posts
Selecting a Bible Reading Plan for the New Year 
Rejoicing In A Morning Slowed 
READ FULL POST >>

Insights About Saving Money & Setting Some New Financial Goals for the Future


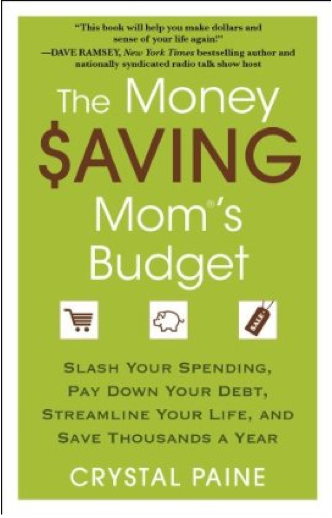
I was in the midst of compiling lists of service-providers to phone, tracking down cardboard boxes to fill up with our belongings, and checking item after item off my list as we prepared to move into our new house when Crystal Paine’s book, The Money Saving Mom’s Budget, arrived in the mail for me to review.

It came at a time when it seemed that there was barely any free time to spare, let alone sit down and read a book while there were contracts waiting to be signed and logistics to be planned.

But as one who has followed Crystal’s frugal-living and personal-finance blog. Money Saving Mom, for more than a year now, I’ve learned to always be impressed by her take on approaching spending and saving at home. Her story is an inspiring one, where she and her husband scraped by while he made his way through law school so that they didn’t take on a dime of debt. Then, once he was out and making money, they lived humbly so that they could save up enough cash to buy their house outright.

While that kind of story isn’t likely to work for everyone (how I'd love to not have a mortgage!), I always admire the way with which she approaches learning to live within your means and seeking out good deals without forgetting that money is not everything in life; God is. She has her priorities in line and that is what matters most to me. (For instance, she's giving away all the proceeds from her book to Compassion International! Love that!)

So with all that in mind, I cracked open the book and started making my way through the first chapter, which happened to be on goal-setting. As my husband and I are in the beginning stages of starting a new chapter in our own financial lives with our new house, this chapter was especially fitting and timely for me.

Even though I’m no stranger to budgeting and setting goals (for instance, you can read more about setting up our travel budget here and how we've tamed our wild eating-out budget here), it had been awhile since my husband and I had sat down and retooled our goals for saving with this new house. We knew from the inspection that it would need a new roof in the next five to ten years. The house also was on a septic system, which can have a limited lifespan, so we knew we wanted to be saving up for that in advance, as well.

In her book, Crystal advises that you figure out what your financial goals are—whether it's saving for a house, a car or even your Christmas gifts—and then build each of those funds methodically over time as part of your monthly budget.

So, we figured out the approximate cost for making those repairs, and then figured out that by saving at least $250 a month, we can save $3,000 a year. Within four years, we’ll have enough to be able to pay for both services! Hopefully they won’t end up coinciding with one another, but we like to play it on the safe side.

Previously, we had just been saving everything extra that we had at the end of the month, but it wasn’t a set amount. This was the key difference for us that will hopefully help us save more, since the money is set aside at the outset rather than as an afterthought.

That’s how Crystal has approached almost all of her savings goals; a little bit at a time while keeping her other spending expenses low.

And the rest of the book looks at many different ways to do just that—keeping your spending under control and finding smart ways to trim your budget—with ideas such as using a cash-only system to trimming your grocery budget (with and without using coupons, which you know I'm in support of!!) to a whole slew of other ideas to learn how to take control of your money, rather than let your money have control over you. Some of the ideas are familiar ones but then others are smart, out-of-the-box ones that I would never have thought of!

From reading her blog and now her new book, I can see how well these practical ideas have paid off for her and am encouraged to apply many of them to our own finances, as well!

You can find The Money Saving Mom’s Budget on Amazon and read Crystal’s blog at Money Saving Mom. (Plus when you purchase her book, she's giving away all the proceeds! How cool is that? You can read more about that here.)

Related Posts
Being Intentional about Saving Money
3 Easy Ways We've Learned to Stretch Our Finances (No Coupons Necessary)
READ FULL POST >>

A New Years Resolution: Adventures in Trying New Foods, from Artichokes to Okra


I’m not usually one for making your typical kind of new year’s resolutions. I don’t see why you ought to put off until tomorrow, what you could start today.

But, I am one for lists (which we already established here). I am one for setting goals and letting those lists guide you through them.

So I decided that this year, I might attempt a different sort of resolution: Try incorporating new foods into my menu plan, each month. There are so many different foods—fruits, legumes, veggies and grains—that I really want to try, but always chicken out of purchasing because I’m not sure how to use it or I am more comfortable with this or that.

Excuses, excuses.

I plan to rectify that this year, by trying out a new-to-me whole food each month. I figure that will give me enough time to source out a variety of recipes that will put the food to good use and won’t be overwhelming, which is usually what steers me away.

Want to see my month-by-month list of foods to try out during the course of this resolution? Here’s the line-up I have in mind:
January: Kale*
February: Brussels sprouts*
March: Cabbage*
April: Lentils
May: Artichokes
June: Quinoa
July: Okra
August: Figs*
September: Eggplant*
October: Turnips
November: Pomegranates
December: Winter squash*
(Where appropriate, I’ll also try to stick to foods that are in season for my region that month, which I’ve noted in the list with an asterick [*]. If you want to see what produce is in season where you are, you can find out with this interactive map.)

Save for the winter squash, I have never cooked with any of these ingredients, and I’ve only made one dish or two dishes with a butternut squash. It’s time to shake things up around here!

I will try to post updates about how my adventures that month with my new food went, as well as any good recipes I try. (I also started a board on Pinterest specifically for this challenge to keep track of some recipes I want to try. You can see and follow that board here.)

Speaking of which, if you know of any good recipes for using any of those ingredients, I’d love to hear your recommendations! Also, if you want to join me on this new year’s resolution to try new foods, let me know what’s on your list. Let’s get adventurous together!

Related Posts
Confessions in Homemaking 
Learning to Cook: An Art I Neglected for 26 Years
{ photo source }

{ Linked up with Life Made Lovely }
READ FULL POST >>

Fighting the Desire to Decorate to Perfection


When things started looking like we were actually going to get this house, I vowed that I would not obsess over decorating it. I vowed that we would tend to the essentials (like beefing up attic insulation and adding deadbolts to the exterior doors) before I would get bogged down in things like mixing and matching and searching out new furniture.

Oh, the good intentions.

Before we had even wrapped up our due diligence period, I was already getting distracted in my Bible reading with thoughts of coordinating paint chips and arranging furniture.

I realized it and I hated it, because that’s not what makes a house. So many people spend so much time decorating and fixing up without really enjoying it, without really sharing the space—which is what really makes a house a home.

I want to ease into this little homestead of ours, take some time to get to know it before I start ripping up carpet and staining the cabinets. I want to get to find my place in it before I jump head over heels into the stuff decorating blogs are made of.

I want to take my time building up this home, bit by bit, rather than feeling the burden of filling it up, nook and cranny, right now. I want to savor the process of that rather than zip straight through to the very end.

I want to practice patience with what we’ve got going on here. Because we plan on staying here for awhile. We plan on putting down roots and raising a little family here. There ought to be no rush.

But that is easier said than done, it seems. Especially now, when I find that as much as I try to fight those reveries, all too often they win out and I realize another hour has passed as I’ve been rearranging imaginary tables and chairs and mixing made-up paint colors in my head.

For now, I take a deep breath and remind myself that I have all the time in the world to nest and make pretty our new perch. I remind myself that it’s okay if a corner sits bare for a few months—even longer—while we figure out what goes there. I remind myself to be comfortable in the tension of the imperfect and the rough-around-the-edges.

Because that is real life.

Welcome, home.

Related Posts
Experiments in Decorating
The Process of Turning a House into a Home

READ FULL POST >>

The Only Resolution That Really Matters


With a new year comes new plans and goals and all varieties of resolutions. While I’m not much of a resolution maker (though I do have a fun one up my sleeve I will be sharing soon!), one of the things that I have marked the new year with the past couple of years has been to use this fresh start to settle on a Bible reading plan that will guide me for the following months.

The past two years, I’ve used a chronological Bible-reading plan that takes you through the Bible more or less in the order that the events written about are thought to have taken place. (For more on this chronological Bible-reading plan and to download a copy, go here.)

The goal of this plan is to walk you through the Bible in a year, which makes it not for the faint hearted because it does require a considerable amount of dedication to sit down with your Bible for an hour or so a day. Because I work from home as a freelance writer (more on that transition here), I have the time to dedicate to that.

Even if you can’t commit to reading as much as they recommend every day, I think that this reading plan has been so valuable for me to gain a much more intimate understanding of the Biblical narrative and storyline. You can easily stretch it out to span more than a year and read each segment in chunks more accommodating to your schedule.

But by reading events that are grouped together—say the Old Testament prophecies along with the historical records in Kings and Chronicles that explain what was going on at that time—I’ve been able to really wrap my head around how all those stories and segments fit together and think that is by far the greatest strength in this reading plan.

To anyone who wants to better understand the Bible in context, I’d highly recommend this chronological reading plan and I wholly expect to read it again in the future!

For this next year, though, I think I am going to slow down and use the next few months to really dig into different Scriptures and to linger with them longer than I was able to when reading through them for this previous plan.

There are books—starting first with that of Hebrews—that I want to back up and chew on, slowly and intentionally. I have already checked some commentaries from the library and downloaded some online resources to get more perspectives on these writings. As I pour over them, I want to ponder them, explore their cross-references, really know them.

To really know them. That has been the desire of my heart for my Bible reading over the past couple of years that I have been attempting to cultivate. And I am loving the fruit that it is bearing.

So, as we inch into this new year, it seems as good a time as any to make an effort to explore this discipline of Bible reading.

Which is why over the next couple of weeks, I’ll be sharing some more Bible-study thoughts and resources that will hopefully aid you as you take this year not only to make resolutions to lose weight or save more or spend time better but to remember that which is most important: to get to know God better by committing to reading more of His Word.

Are you starting a new Bible reading plan this year? What kind of approach do you use for reading the Scriptures? I'd love to hear more in the comments!

Related Posts
Embracing What My Prayer Time Looks Like in Different Seasons of Life
Unexpected insights from a boring Old Testament list
READ FULL POST >>

Hello, 2012. It’s Nice to Finally Meet You.


Ah. It feels good to be welcoming a new year, especially since I spent the last month tending to getting settled into our new house (you can see a sneak peek inside our new house here and read more about our experience purchasing it here) and taking a break from writing new blog posts.

I feel refreshed and ready for this new year of ours, so thank you for your patience while the blog took a well-timed and much-appreciated reprieve!

But even if things around this neck of the interweb-woods was quiet, things on the other side of the computer screen were definitely not!

We signed the papers to close on our house in mid-November and spent the next couple of weeks getting everything set up at the house and taking our time packing and moving stuff over, little by litter. Our previous move all happened in a two-day span of time (from finding the apartment to moving in, more on that here), so this slower pace was much appreciated!

Finally, we moved the last of everything on December 8, putting all the bulky furnishings and fixings in place and making the house really start to feel like a home.

Of course, though, that is just the beginning. Then came the big task of unpacking, unsorting, unshuffling everything into new spaces, nooks and crannies. That can be such an overwhelming process and one that I’m not even close to done with yet!

While much of our day-to-day living items have found homes here, there’s quite a bit that still hasn’t. And that’s okay, because I keep telling myself that we are not in a rush. We signed the papers to own this house for thirty years, so that should give me plenty of time to unpack it all!

We did do a little painting (in the kitchen, can’t wait to share that process soon!) and bought some grown-up desks for our office. We had the chimney cleaned, the ducts vacuumed out and a couple of drafty doors replaced. We hung blinds and rearranged furniture and tried to keep ourselves from getting consumed with the idea of making everything perfect, right now.

There’s time for all that.

Until then, as we inch along, making changes and updates and fixes little by little, I can’t wait to share them with you throughout this new years of ours. Along with, of course, plenty of other insights, ideas and inspirations that crop up from time to time.

Here’s to making the most of 2012!

Related Posts
The Process of Turning a House into a Home
A Prayer for a “Humble but Sturdy” Home
READ FULL POST >>
Next Post Previous Post
Related Posts Plugin for WordPress, Blogger...